cms免费开源/网站怎么优化到首页
最近在Pytorch官方网站学习入门课程,第一步当然就是数据的载入和预处理啦,下面对本章学习做一下总结,本文中只提炼必要的关键性步骤。
以下内容均源自:DATA LOADING AND PROCESSING TUTORIAL
为确保顺利运行,环境中需要有以下两个包:
- skimage:python自带的图像处理库
- pandas:可以快速遍历csv文件
准备工作
首先,用import操作导入需要的包:
from __future__ import print_function,division
import os
import torch
import pandas as pd
from skimage import io,transform
import numpy as np
import matplotlib.pyplot as plt
from torch.utils.data import Dataset,DataLoader
from torchvision import transforms,utils
然后,在这里下载人脸数据集,其中包括:
- face_landmarks.csv(人脸标记点坐标)
- create_landmark_dataset.py
- 示例图片
其中,csv文件中每一行的第一项为img_name,之后有68个标记点坐标。
image_name,part_0_x,part_0_y,part_1_x,part_1_y,part_2_x, ... ,part_67_x,part_67_y
下载完成后,在本地导入csv文件,这里使用绝对路径
landmarks_frame = pd.read_csv("C:\\Users\\85233\\Desktop\\faces\\face_landmarks.csv")
定义一个函数,来显示一张图片和上面的标记点:
def show_landmarks(image, landmarks):plt.imshow(image)plt.scatter(landmarks[:, 0], landmarks[:, 1], s=10, marker='.', c='r')plt.pause(0.001) # pause a bit so that plots are updated
定义数据集类
torch.utils.data.Dataset 是表示一个数据集的抽象类,我们接下来写的数据集类必须继承它,并重写以下两个方法:
- __ len __ : 返回数据集的长度
- __ get_item __: 读取 dataset[i]
整个数据集为一个字典:{‘image’: image, ‘landmarks’: landmarks}
class FaceLandmarksDataset(Dataset):"""Face Landmarks dataset."""def __init__(self, csv_file, root_dir, transform=None):"""Args:csv_file (string): Path to the csv file with annotations.root_dir (string): Directory with all the images.transform (callable, optional): Optional transform to be appliedon a sample."""self.landmarks_frame = pd.read_csv(csv_file)self.root_dir = root_dirself.transform = transformdef __len__(self):return len(self.landmarks_frame)def __getitem__(self, idx):if torch.is_tensor(idx):idx = idx.tolist()img_name = os.path.join(self.root_dir,self.landmarks_frame.iloc[idx, 0]) #得到图片路径image = io.imread(img_name)landmarks = self.landmarks_frame.iloc[idx, 1:]landmarks = np.array([landmarks])landmarks = landmarks.astype('float').reshape(-1, 2)sample = {'image': image, 'landmarks': landmarks}if self.transform:sample = self.transform(sample)return sample
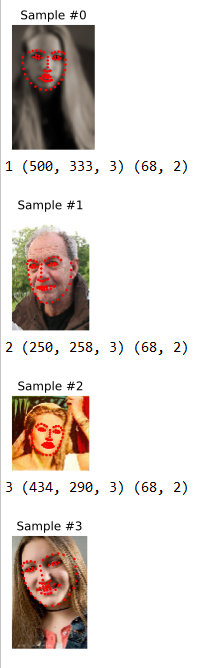
接下来,实例化数据集类,并打印前4张图片(非必需)
dataset = FaceLandmarksDataset(csv_file = "C:\\Users\\85233\\Desktop\\faces\\face_landmarks.csv",root_dir = "C:\\Users\\85233\\Desktop\\faces\\")
fig = plt.figure()for i in range(len(face_dataset)):sample = face_dataset[i]print(i, sample['image'].shape, sample['landmarks'].shape)ax = plt.subplot(1, 4, i + 1)plt.tight_layout()ax.set_title('Sample #{}'.format(i))ax.axis('off')show_landmarks(**sample)if i == 3:plt.show()break
运行代码后,得到如下结果:
图像转换(Transform)
在工程中,由于图像尺寸不符等原因,经常需要对图片进行转换,再输入网络。下面实现三个变换:
- Rescale:重新设定图片尺寸
- RandomCrop:随机截取一部分图片
- ToTensor:把numpy表示的图像数组转换为tensor向量(转换坐标轴即可)
我们需要把Transform定义为可调用的类(callable class) 而不是简单的函数,这样做的好处是Transform的参数就不需要在每次调用的时候都传递一次。为此,我们需要重写__ call 方法和 init __方法(如果需要的话)。我们可以这样使用一种Transform:
tsfm = Transform(params)
transformed_sample = tsfm(sample)
以下是三种转换的实现:
class Rescale(object):"""Rescale the image in a sample to a given size.Args:output_size (tuple or int): Desired output size. If tuple, output ismatched to output_size. If int, smaller of image edges is matchedto output_size keeping aspect ratio the same."""def __init__(self, output_size):assert isinstance(output_size, (int, tuple))self.output_size = output_sizedef __call__(self, sample):image, landmarks = sample['image'], sample['landmarks']h, w = image.shape[:2]if isinstance(self.output_size, int):if h > w:new_h, new_w = self.output_size * h / w, self.output_sizeelse:new_h, new_w = self.output_size, self.output_size * w / helse:new_h, new_w = self.output_sizenew_h, new_w = int(new_h), int(new_w)img = transform.resize(image, (new_h, new_w))# h and w are swapped for landmarks because for images,# x and y axes are axis 1 and 0 respectivelylandmarks = landmarks * [new_w / w, new_h / h]return {'image': img, 'landmarks': landmarks}class RandomCrop(object):"""Crop randomly the image in a sample.Args:output_size (tuple or int): Desired output size. If int, square cropis made."""def __init__(self, output_size):assert isinstance(output_size, (int, tuple))if isinstance(output_size, int):self.output_size = (output_size, output_size)else:assert len(output_size) == 2self.output_size = output_sizedef __call__(self, sample):image, landmarks = sample['image'], sample['landmarks']h, w = image.shape[:2]new_h, new_w = self.output_sizetop = np.random.randint(0, h - new_h)left = np.random.randint(0, w - new_w)image = image[top: top + new_h,left: left + new_w]landmarks = landmarks - [left, top]return {'image': image, 'landmarks': landmarks}class ToTensor(object):"""Convert ndarrays in sample to Tensors."""def __call__(self, sample):image, landmarks = sample['image'], sample['landmarks']# swap color axis because# numpy image: H x W x C# torch image: C X H X Wimage = image.transpose((2, 0, 1))return {'image': torch.from_numpy(image),'landmarks': torch.from_numpy(landmarks)}
组合转换
torchvision.transforms.Compose函数可以很方便地帮助我们组合转换,例如:
scale = Rescale(256)
crop = RandomCrop(128)
composed = transforms.Compose([Rescale(256),RandomCrop(224)])# Apply each of the above transforms on sample.
fig = plt.figure()
sample = face_dataset[65]
for i, tsfrm in enumerate([scale, crop, composed]):transformed_sample = tsfrm(sample)ax = plt.subplot(1, 3, i + 1)plt.tight_layout()ax.set_title(type(tsfrm).__name__)show_landmarks(**transformed_sample)plt.show()
在数据集中迭代
首先,实例化数据集类:
transformed_dataset = FaceLandmarksDataset(csv_file="C:\\Users\\85233\\Desktop\\faces\\face_landmarks.csv",root_dir="C:\\Users\\85233\\Desktop\\faces\\",transform=transforms.Compose([Rescale(256),RandomCrop(224),ToTensor()]))
之后,我们可以使用 torch.utils.data.DataLoader 加载数据,它提供以下功能:
- 给数据分片
- 随机打乱数据
- 使用GPU并行加载数据
dataloader = DataLoader(transformed_dataset, batch_size=4,shuffle=True, num_workers=4)
实现一个函数来展示一个batch:
def show_landmarks_batch(sample_batched):"""Show image with landmarks for a batch of samples."""images_batch, landmarks_batch = \sample_batched['image'], sample_batched['landmarks']batch_size = len(images_batch)im_size = images_batch.size(2)grid_border_size = 2grid = utils.make_grid(images_batch)plt.imshow(grid.numpy().transpose((1, 2, 0)))for i in range(batch_size):plt.scatter(landmarks_batch[i, :, 0].numpy() + i * im_size + (i + 1) * grid_border_size,landmarks_batch[i, :, 1].numpy() + grid_border_size,s=10, marker='.', c='r')plt.title('Batch from dataloader')for i_batch, sample_batched in enumerate(dataloader):print(i_batch, sample_batched['image'].size(),sample_batched['landmarks'].size())# observe 4th batch and stop.if i_batch == 3:plt.figure()show_landmarks_batch(sample_batched)plt.axis('off')plt.ioff()plt.show()break
运行代码后,得到以下结果:
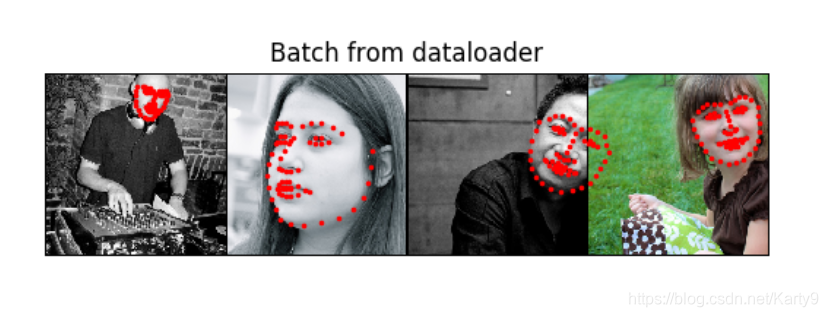
0 torch.Size([4, 3, 224, 224]) torch.Size([4, 68, 2])
1 torch.Size([4, 3, 224, 224]) torch.Size([4, 68, 2])
2 torch.Size([4, 3, 224, 224]) torch.Size([4, 68, 2])
3 torch.Size([4, 3, 224, 224]) torch.Size([4, 68, 2])
Afterword: torchvision
在实际工程中,我们并不需要自己定义图像的转换,可以在torchvision中直接调用。
import torch
from torchvision import transforms, datasetsdata_transform = transforms.Compose([transforms.RandomSizedCrop(224),transforms.RandomHorizontalFlip(),transforms.ToTensor(),transforms.Normalize(mean=[0.485, 0.456, 0.406],std=[0.229, 0.224, 0.225])])
hymenoptera_dataset = datasets.ImageFolder(root='hymenoptera_data/train',transform=data_transform)
dataset_loader = torch.utils.data.DataLoader(hymenoptera_dataset,batch_size=4, shuffle=True,num_workers=4)