dw怎么做网站布局/微博营销案例
之前一直对消息中间件不了解,也是年后找工作才知道有这么些东西。然而也一直没有去试着了解它们可能觉得陌生的东西就会有点畏惧吧。不过今天简单的实现了下发现其实有些东西也没这么可怕o(´^`)o
(作者此次都是基于Windows)权作初学演示
先做些准备工作我们先下载下RabbitMQ
因为RabbitMQ是用ERLANG语言编写所以我们需要在机器上下载一个ERLANG。
http://www.erlang.org/downloads 【下载请戳<<】

安装比较简单就省略了,就指定下安装的文件夹然后next就好了。主要是要配置下环境变量。
【具体为你的安装目录vvv】
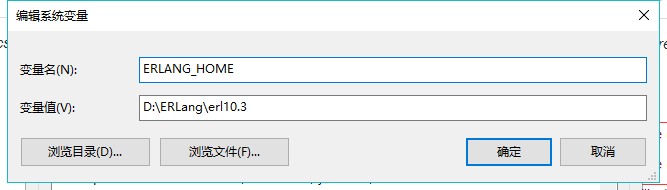
然后在path里面配置

在CMD中输入erl出现以下就表示安装好啦。很简单呀·!ヽ( ̄▽ ̄)ノ

接着下载我们的大哥RabbitMQ
https://www.rabbitmq.com/download.html 【官网下载请戳<<】
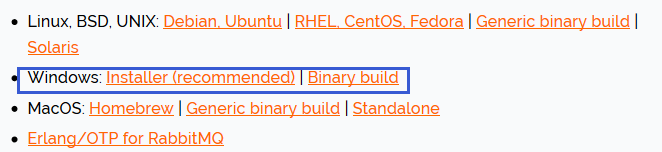
不过如果你和作者一样和这个官网下载无缘死活下不来的话也可以到作者的百度云下载【请戳vv】
链接:https://pan.baidu.com/s/17fDa-1Br9IIohtvMY5orEw
提取码:o8vy
安装过程和erlang一样比较清晰,所以也不就贴了选好安装的文件夹就好了。主要是安装rabbit-plugins
引用下大佬的文章,谢谢(✪ω✪)
https://blog.csdn.net/weixin_39735923/article/details/79288578
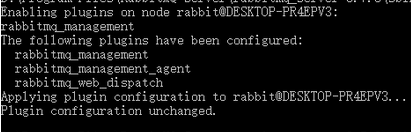
打开CMD切换到安装完后/sbin文件夹如我的是cd D:\rebbit\rabbitmq_server-3.7.9\sbin
进入后输入rabbitmq-plugins enable rabbitmq_management
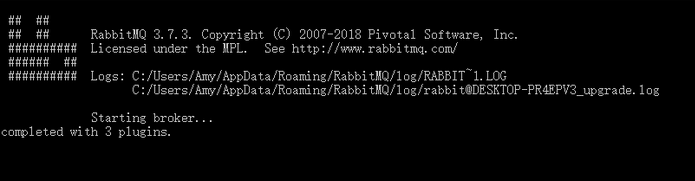
然后去到 sbin的文件夹下 如我的:D:\rebbit\rabbitmq_server-3.7.9\sbin
 双击运行出现
在浏览器输入http://localhost:15672 【就会出现登录界面默认账号:guest密码:guest】
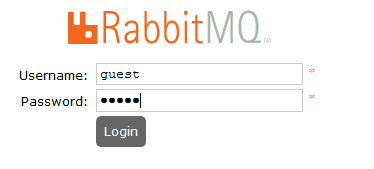 你就可以去到RabbitMQ的管理界面啦~(✪ω✪)
【到此准备阶段结束,真正的战斗才开始】
先用IDE(IDEA,Eclipse,MyEclipse)启动一个SpringBoot项目然后引入RabbitMQ依赖即可
<dependency><groupId>org.springframework.boot</groupId><artifactId>spring-boot-starter-amqp</artifactId></dependency>
以下部分代码借鉴下面的大佬,谢谢【详细可以请戳vv】
https://blog.csdn.net/qq_38455201/article/details/80308771
准备配置文件application.propertise当然.yml也可以
#对于rabbitMQ的支持
spring.rabbitmq.host=127.0.0.1
spring.rabbitmq.port=5672 #注意:这里是5672
spring.rabbitmq.username=guest
spring.rabbitmq.password=guest
准备一个RabbitConfig类,主要使用注解进行配置
@Configurationpublic class RabbitConfig {private final Logger logger = LoggerFactory.getLogger(this.getClass());@Value("${spring.rabbitmq.host}")private String host;@Value("${spring.rabbitmq.port}")private int port;@Value("${spring.rabbitmq.username}")private String username;@Value("${spring.rabbitmq.password}")private String password;public static final String EXCHANGE_A = "my-mq-exchange_A";public static final String EXCHANGE_B = "my-mq-exchange_B";public static final String EXCHANGE_C = "my-mq-exchange_C";public static final String QUEUE_A = "QUEUE_A";public static final String QUEUE_B = "QUEUE_B";public static final String QUEUE_C = "QUEUE_C";public static final String ROUTINGKEY_A = "spring.boot.routingKey.A"; public static final String ROUTINGKEY_B = "spring.boot.routingKey.#"; //作为之后TopicExchange使用public static final String ROUTINGKEY_C = "spring-boot-routingKey_C";@Beanpublic ConnectionFactory connectionFactory(){CachingConnectionFactory connectionFactory = new CachingConnectionFactory();connectionFactory.setUsername(username);connectionFactory.setPassword(password);connectionFactory.setHost(host);connectionFactory.setVirtualHost("/");connectionFactory.setPublisherConfirms(true);return connectionFactory;}@Bean@Scope(ConfigurableBeanFactory.SCOPE_PROTOTYPE)//必须是prototype类型public RabbitTemplate rabbitTemplate(){RabbitTemplate rabbitTemplate = new RabbitTemplate(connectionFactory());return rabbitTemplate;}@Beanpublic DirectExchange defaultExchange(){return new DirectExchange(EXCHANGE_A); //作为Direct交换}@Beanpublic TopicExchange topicExchange(){return new TopicExchange(EXCHANGE_B); //作为Topic交换}@Beanpublic FanoutExchange fanoutExchange(){return new FanoutExchange(EXCHANGE_C); //作为Fanout交换}@Beanpublic Queue queueA(){return new Queue(QUEUE_A,true); //配置队列A}@Bean// public Binding binding(){// return BindingBuilder.bind(queueA()).to(defaultExchange()).with(RabbitConfig.ROUTINGKEY_A); //如使用DirectExchange和队列A绑定// }// public Binding binding(){// return BindingBuilder.bind(queueA()).to(topicExchange()).with(RabbitConfig.ROUTINGKEY_A); //如使用TopicExchange和队列A绑定// }// public Binding bingding(){// return BindingBuilder.bind(queueA()).to(fanoutExchange()); //如使用FanoutExchange和队列A绑定// }@Beanpublic Queue queueB(){return new Queue(QUEUE_B,true); //配置队列B}@Bean// public Binding bindingB(){// return BindingBuilder.bind(queueB()).to(defaultExchange()).with(RabbitConfig.ROUTINGKEY_B);//如使用DirectExchange和队列B绑定// }// public Binding bindingB(){// return BindingBuilder.bind(queueB()).to(topicExchange()).with(RabbitConfig.ROUTINGKEY_B);//如使用TopicExchange和队列B绑定// }// public Binding bingdingB(){// return BindingBuilder.bind(queueB()).to(fanoutExchange()); //如使用FanoutExchange和队列绑定}}
准备一个生产者类MsgProducer
@Component
public class MsgProducer implements RabbitTemplate.ConfirmCallback {private final Logger logger = LoggerFactory.getLogger(this.getClass());private RabbitTemplate rabbitTemplate;@Overridepublic void confirm(CorrelationData correlationData, boolean b, String s) { //消息的回调方法logger.info("回调ID" + correlationData);if (b){logger.info("消息被成功消费了");}else{logger.info("消息消费失败" + s);}}@Autowiredpublic MsgProducer(RabbitTemplate rabbitTemplate){this.rabbitTemplate = rabbitTemplate;rabbitTemplate.setConfirmCallback(this);}/**以下三个方法主要是针对交换路由的匹配队列的规则不同而进行区分DirectExchange要求路由密钥(此文中RabbitConfig的ROUTINGKEY_A、ROUTINGKEY_B、ROUTINGKEY_C)是完全一致才匹配相应的队列TopicExchange就比较宽松有点类似模糊查询你可以把路由密钥配置成ROUTINGKEY_B(spring.boot.routingKey.#)这样,并且若使用TopicExchange的话密钥是"点分"的即单词之间用"."间隔。.#b表示可以匹配任意只要前缀是spring.boot.routingKey .*表示匹配一个字母如spring.boot.routingKey.AFanoutExchange匹配所有不管密钥发送给绑定此路由的所有队列*///如果是使用DirectExchange的话使用此方法public void sendMsg(String content){	CorrelationData correlationId = new CorrelationData(UUID.randomUUID().toString());rabbitTemplate.convertAndSend(RabbitConfig.EXCHANGE_A,RabbitConfig.ROUTINGKEY_A,content,correlationId);}//如果是使用TopicExchange的话使用此方法public  void sendTopic(String content){CorrelationData correlationId = new CorrelationData(UUID.randomUUID().toString());rabbitTemplate.convertAndSend(RabbitConfig.EXCHANGE_B,"spring.boot.routingKey.A",content,correlationId);}//如果是使用FanoutExchange的话使用此方法public void fanout(String content){CorrelationData correlationId = new CorrelationData(UUID.randomUUID().toString());rabbitTemplate.convertAndSend(RabbitConfig.EXCHANGE_C,"",content,correlationId);}
}
准备消费者MsgConsumer此处我准备了三个因为RabbitMQ消息发给多个队列的消费者是负载均衡的
分别为三个类(MsgReceiverA1、MsgReceiverA2、MsgReceiverB1)
//【MsgReceiverA1】
@Component
@RabbitListener(queues = RabbitConfig.QUEUE_A)
public class MsgReceiverA1 {private final Logger logger = LoggerFactory.getLogger(this.getClass());@RabbitHandlerpublic void process(String content) throws InterruptedException {logger.info("这是A1接收处理队列A中的消息" + content);Thread.sleep(500);}
}
//【MsgReceiverA2】
@Component
@RabbitListener(queues = RabbitConfig.QUEUE_A)
public class MsgReceiverA2 {private final Logger logger = LoggerFactory.getLogger(this.getClass());@RabbitHandlerpublic void process(String content) throws InterruptedException {logger.info("这是A2接收处理队列A中的消息" + content);Thread.sleep(500);}
}
//【MsgReceiverB1】
@Component
@RabbitListener(queues = RabbitConfig.QUEUE_B)
public class MsgReceiverB1 {private final Logger logger = LoggerFactory.getLogger(this.getClass());@RabbitHandlerpublic void process(String content) throws InterruptedException {logger.info("接收处理队列B中的消息" + content);Thread.sleep(500);}
}
之后我们准备一个Test就可以进行简单的测试了
@SpringBootTest
@RunWith(SpringJUnit4ClassRunner.class)
@WebAppConfiguration
public class TestRabbitMQ {@ResourceMsgProducer msgProducer;@ResourceRabbitConfig rabbitConfig;@Testpublic void testSend() throws InterruptedException {msgProducer = new MsgProducer(rabbitConfig.rabbitTemplate());for(int x = 0;x < 15;x++){Thread.sleep(500); //稍作等待//msgProducer.sendMsg("这是第" + x + "条消息");	//如使用DirectExchange则使用此方法注解其他两个方法//msgProducer.sendTopic("这是第" + x + "条消息"); //如使用TopicExchange则使用此方法注解其他两个方法msgProducer.fanout("这是第" + x + "条消息");		   //如使用FanoutExchange则使用此方法注解其他两个方法}}
}
输出大抵如下【FanoutExchange】
 以上就是简单的RabbitMQ和SpringBoot的整合如有错误的地方或造成大家误解的地方大家可以留言给我,谢谢!(✪ω✪)(✪ω✪)