网站建设泽宇/百度企业推广怎么收费
一、Netty基本介绍
Netty是由JBOSS提供的一个java开源框架。Netty提供异步的、事件驱动的网络应用程序框架和工具,用以快速开发高性能、高可靠性的网络服务器和客户端程序。Netty 在保证易于开发的同时还保证了其应用的性能,稳定性和伸缩性。
Netty 是一个基于NIO的客户、服务器端的编程框架,使用Netty 可以确保你快速和简单的开发出一个网络应用,例如实现了某种协议的客户、服务端应用。Netty相当于简化和流线化了网络应用的编程开发过程,例如:基于TCP和UDP的socket服务开发。
本文主要介绍Netty中的核心类之一的:ServerBootstrap类。
ServerBootstrap是服务端的启动配置类,主要用于绑定我们创建的 EventLoopGroup,指定 Channel 的类型以及绑定 Channel 处理器等操作,主要做的都是给属性赋值操作,所以称其为配置类。Bootstrap 则是客户端的启动配置类。
二、继承体系
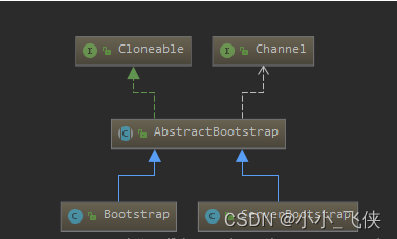
三、ServerBootstrap类
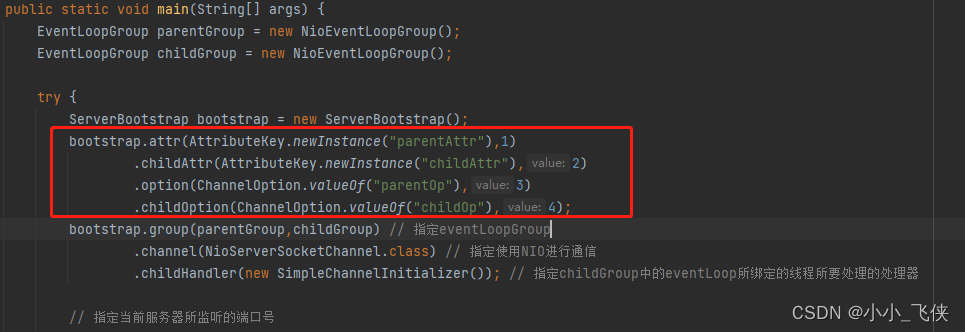
我们先看下代码入口:
EventLoopGroup parentGroup = new NioEventLoopGroup();
EventLoopGroup childGroup = new NioEventLoopGroup();try {ServerBootstrap bootstrap = new ServerBootstrap();bootstrap.group(parentGroup,childGroup) // 指定eventLoopGroup.channel(NioServerSocketChannel.class) // 指定使用NIO进行通信.childHandler(new SimpleChannelInitializer())// 指定childGroup中的eventLoop所绑定的线程所要处理的处理器.attr(AttributeKey.newInstance("parentAttr"),1).childAttr(AttributeKey.newInstance("childAttr"),2).option(ChannelOption.valueOf("parentOp"),3).childOption(ChannelOption.valueOf("childOp"),4);// 指定当前服务器所监听的端口号// bind()方法的执行是异步的// sync()方法会使bind()操作与后续的代码的执行由异步变为了同步ChannelFuture future = bootstrap.bind(5055).sync();// 关闭Channel// closeFuture()的执行是异步的。// 当Channel调用了close()方法并关闭成功后才会触发closeFuture()方法的执行future.channel().closeFuture().sync();
} catch (Exception e) {e.printStackTrace();
} finally {parentGroup.shutdownGracefully();childGroup.shutdownGracefully();
}
ServerBootstrap初始化调用了无参构造器,并没有具体逻辑,我们看下group()方法
public ServerBootstrap group(EventLoopGroup parentGroup, EventLoopGroup childGroup) {super.group(parentGroup);if (childGroup == null) {throw new NullPointerException("childGroup");}if (this.childGroup != null) {throw new IllegalStateException("childGroup set already");}this.childGroup = childGroup;return this;
}
这里主要是做一些属性填充的工作。 channel()方法和childHandler()方法也是类似的。
直接从bootstrap.bind()方法进去:
// io.netty.bootstrap.AbstractBootstrap#bind(int)
public ChannelFuture bind(int inetPort) {return bind(new InetSocketAddress(inetPort));
}// 继续跟进
public ChannelFuture bind(SocketAddress localAddress) {// 验证group与channelFactory是否为nullvalidate(); if (localAddress == null) {throw new NullPointerException("localAddress");}return doBind(localAddress);
}
跟进去doBind()方法
private ChannelFuture doBind(final SocketAddress localAddress) {// 创建、初始化channel,并将其注册到selector,返回一个异步结果final ChannelFuture regFuture = initAndRegister();// 从异步结果中获取channelfinal Channel channel = regFuture.channel();// 若异步操作执行过程中出现了异常,则直接返回异步对象(直接结束)if (regFuture.cause() != null) {return regFuture;}// 处理异步操作完成的情况(可能是正常结束,或发生异常,或任务取消,这些情况都属于有结果的情况)if (regFuture.isDone()) {ChannelPromise promise = channel.newPromise();// 绑定指定的端口doBind0(regFuture, channel, localAddress, promise);return promise;} else {  // 处理异步操作尚未有结果的情况final PendingRegistrationPromise promise = new PendingRegistrationPromise(channel);// 为异步操作添加监听regFuture.addListener(new ChannelFutureListener() {// 若异步操作具有了结果(即完成),则触发该方法的执行@Overridepublic void operationComplete(ChannelFuture future) throws Exception {Throwable cause = future.cause();if (cause != null) { // 异步操作执行过程中出现了问题promise.setFailure(cause);} else {  // 异步操作正常结果promise.registered();// 绑定指定的端口doBind0(regFuture, channel, localAddress, promise);}}});return promise;}
}
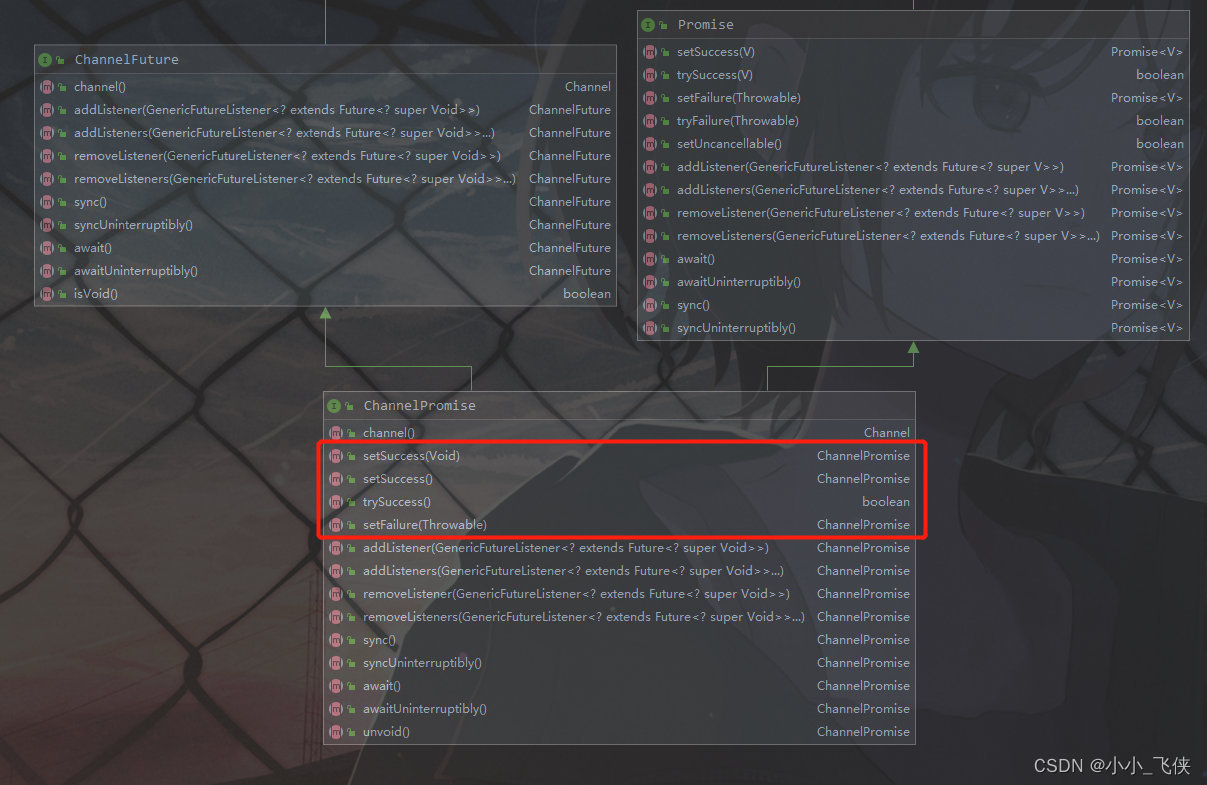
这里重点关注两个方法:initAndRegister()和doBind0(),在此之前,先了解下ChannelPromise 与 ChannelFuture
1.ChannelPromise 与 ChannelFuture
ChannelFuture 只可以查询当前异步操作的结果,不可以修改当前异步结果的 Future。ChannelPromise 可以修改当前异步结果的状态,并且在修改状态是会触发监听器。在doBind()方法中主要用于在处理异步执行一直未结束的的操作,将异步结果存在异常的时,将异常赋值给 ChannelPromise 并返回。
2.initAndRegister()方法
跟进去initAndRegister()方法,该方法主要是初始化并创建channel
final ChannelFuture initAndRegister() {Channel channel = null;try {// 创建channelchannel = channelFactory.newChannel();// 初始化channelinit(channel);} catch (Throwable t) {if (channel != null) {channel.unsafe().closeForcibly();return new DefaultChannelPromise(channel, GlobalEventExecutor.INSTANCE).setFailure(t);}return new DefaultChannelPromise(new FailedChannel(), GlobalEventExecutor.INSTANCE).setFailure(t);}// 将channel注册到selectorChannelFuture regFuture = config().group().register(channel);if (regFuture.cause() != null) {if (channel.isRegistered()) {channel.close();} else {channel.unsafe().closeForcibly();}}return regFuture;
}
2.1创建channel
跟进去channelFactory.newChannel()方法
@Override
public T newChannel() {try {return constructor.newInstance();} catch (Throwable t) {throw new ChannelException("Unable to create Channel from class " + constructor.getDeclaringClass(), t);}
}
我们在设置channel类型的时候设置的是NioServerSocketChannel.class,所有我们跟进到NioServerSocketChannel的构造器中
// NIO中的provider,其用于创建selector与channel。并且是单例的
private static final SelectorProvider DEFAULT_SELECTOR_PROVIDER = SelectorProvider.provider();public NioServerSocketChannel() {this(newSocket(DEFAULT_SELECTOR_PROVIDER));
}
先跟进去newSocket,随后跟进去this(ServerSocketChannel )方法
private static ServerSocketChannel newSocket(SelectorProvider provider) {try { // 创建NIO原生的channel => ServerSocketChannelreturn provider.openServerSocketChannel();} catch (IOException e) {throw new ChannelException("Failed to open a server socket.", e);}
}
跟进去this(ServerSocketChannel )方法
public NioServerSocketChannel(ServerSocketChannel channel) {// 参数1:父channel// 参数2:NIO原生channel// 参数3:指定当前channel所关注的事件为  接受连接super(null, channel, SelectionKey.OP_ACCEPT);// 用于对channel进行配置的属性集合config = new NioServerSocketChannelConfig(this, javaChannel().socket());
}
new NioServerSocketChannelConfig(),就是给当前 Channel 的 config 进行赋值,用来保存当前 Channel 的属性配置的集合
接着跟主线,跟进去super()
// io.netty.channel.nio.AbstractNioMessageChannel#AbstractNioMessageChannel
protected AbstractNioMessageChannel(Channel parent, SelectableChannel ch, int readInterestOp) {super(parent, ch, readInterestOp);
}// io.netty.channel.nio.AbstractNioChannel#AbstractNioChannel
protected AbstractNioChannel(Channel parent, SelectableChannel ch, int readInterestOp) {super(parent);// 这里的this.ch为NIO原生channelthis.ch = ch;this.readInterestOp = readInterestOp;try {// NIO,非阻塞ch.configureBlocking(false);} catch (IOException e) {try {ch.close();} catch (IOException e2) {if (logger.isWarnEnabled()) {logger.warn("Failed to close a partially initialized socket.", e2);}}throw new ChannelException("Failed to enter non-blocking mode.", e);}
}
接着跟进去super()
// io.netty.channel.AbstractChannel#AbstractChannel(io.netty.channel.Channel)
protected AbstractChannel(Channel parent) {this.parent = parent;// 为channel生成id,由五部分构成id = newId();// 生成一个底层操作对象unsafeunsafe = newUnsafe();// 创建与这个channel相绑定的channelPipelinepipeline = newChannelPipeline();
}
创建channel主要做了以下的事情:
- 创建一个原生的NioChannel
- 将原生channel设置为非阻塞
- 将readInterestOp设置为SelectionKey.OP_ACCEPT(接受连接)
- 位channel生成一个id
- 生成unsafe对象
- 创建与channel绑定的pileline
2.2初始化channel
跟进去init(Channel)方法
void init(Channel channel) throws Exception {// 获取serverBootstrap中的options属性final Map<ChannelOption<?>, Object> options = options0();// 将options属性设置到channelsynchronized (options) {setChannelOptions(channel, options, logger);}// 获取serverBootstrap中的attrs属性final Map<AttributeKey<?>, Object> attrs = attrs0();synchronized (attrs) {// 遍历attrs属性for (Entry<AttributeKey<?>, Object> e: attrs.entrySet()) {@SuppressWarnings("unchecked")AttributeKey<Object> key = (AttributeKey<Object>) e.getKey();// 将当前遍历的attr初始化到channelchannel.attr(key).set(e.getValue());}}// 获取channel的pipelineChannelPipeline p = channel.pipeline();// 将serverBootstrap中所有以child开头的属性写入到局部变量,// 然后将它们初始化到childChannel中final EventLoopGroup currentChildGroup = childGroup;final ChannelHandler currentChildHandler = childHandler;final Entry<ChannelOption<?>, Object>[] currentChildOptions;final Entry<AttributeKey<?>, Object>[] currentChildAttrs;synchronized (childOptions) {currentChildOptions = childOptions.entrySet().toArray(newOptionArray(0));}synchronized (childAttrs) {currentChildAttrs = childAttrs.entrySet().toArray(newAttrArray(0));}p.addLast(new ChannelInitializer<Channel>() {@Overridepublic void initChannel(final Channel ch) throws Exception {final ChannelPipeline pipeline = ch.pipeline();ChannelHandler handler = config.handler();if (handler != null) {pipeline.addLast(handler);}ch.eventLoop().execute(new Runnable() {@Overridepublic void run() {// 将ServerBootstrapAcceptor处理器添加到pipeline// ServerBootstrapAcceptor处理器用于接收ServerBootstrap中的属性值,// 我们通常称其为连接处理器pipeline.addLast(new ServerBootstrapAcceptor(ch, currentChildGroup, currentChildHandler, currentChildOptions, currentChildAttrs));}});}});
}
初始化方法先对attr和option进行填充赋值,attr和option的来源是在初始化的时候设置的值
这些值在后续的传递中可以拿到
Attribute<Object> childAttr = channel.attr(AttributeKey.valueOf("childAttr"));
childAttr.get();
Attribute<Object> parentAttr = channel.attr(AttributeKey.valueOf("parentAttr"));
parentAttr.get();
Object childOp = channel.config().getOption(ChannelOption.valueOf("childOp"));
Object parentOp = channel.parent().config().getOption(ChannelOption.valueOf("parentOp"));
这里使用局部变量记录了所有 Child 相关的值 currentChildGroup, currentChildHandler, currentChildOptions, currentChildAttrs 主要用于初始化 childChannel 的属性,new ServerBootstrapAcceptor(ch, currentChildGroup, currentChildHandler, currentChildOptions, currentChildAttrs)) 主要是创建 连接处理器。
p.addLast(new ChannelInitializer<Channel>() {@Overridepublic void initChannel(final Channel ch) throws Exception {final ChannelPipeline pipeline = ch.pipeline();ChannelHandler handler = config.handler();if (handler != null) {pipeline.addLast(handler);}ch.eventLoop().execute(new Runnable() {@Overridepublic void run() {// 将ServerBootstrapAcceptor处理器添加到pipeline// ServerBootstrapAcceptor处理器用于接收ServerBootstrap中的属性值,// 我们通常称其为连接处理器pipeline.addLast(new ServerBootstrapAcceptor(ch, currentChildGroup, currentChildHandler, currentChildOptions, currentChildAttrs));}});}
});
首先这里想做的事情是:将当前 channel 的 pipeline 中绑定一个初始化处理器 ChannelInitializer ,主要的操作是处理 childGroup 里面的 channel 的初始化操作
这里因为 ServerBootstrap 服务端是对用的有两个 EventLoopGroup,在服务端,parentGroup 是用于接收客户端的连接,在 parentGroup 接收到连接之后是将只是将当前转给了 childGroup去处理后续操作,而 childGroup 是用来专门处理连接后的操作的,不关心 channel 的连接任务。这个其实就是 Netty-Server 的 Reactor 线程池模型的处理逻辑。
2.2.1ServerBootstrapAcceptor (childGroup 里面的 channel 的初始化)
进入ServerBootstrapAcceptor(ch, currentChildGroup, currentChildHandler, currentChildOptions, currentChildAttrs))方法
private static class ServerBootstrapAcceptor extends ChannelInboundHandlerAdapter {private final EventLoopGroup childGroup;private final ChannelHandler childHandler;private final Entry<ChannelOption<?>, Object>[] childOptions;private final Entry<AttributeKey<?>, Object>[] childAttrs;private final Runnable enableAutoReadTask;ServerBootstrapAcceptor(final Channel channel, EventLoopGroup childGroup, ChannelHandler childHandler,Entry<ChannelOption<?>, Object>[] childOptions, Entry<AttributeKey<?>, Object>[] childAttrs) {this.childGroup = childGroup;this.childHandler = childHandler;this.childOptions = childOptions;this.childAttrs = childAttrs;// See https://github.com/netty/netty/issues/1328enableAutoReadTask = new Runnable() {@Overridepublic void run() {channel.config().setAutoRead(true);}};}
}
可以看到ServerBootstrapAcceptor继承了ChannelInboundHandlerAdapter类,而构造方法只是将 ServerBootstrap 中配置的 Child 属性设置保存下来。而这里一直说这是连接处理器,是因为当客户端连接发送到服务端时,这个处理器会接收客户端的连接并处理。
主要是处理方法是 channelRead 中的实现:
public void channelRead(ChannelHandlerContext ctx, Object msg) {// msg为客户端发送来的数据,其为NioSocketChannel,即子channel,childChannelfinal Channel child = (Channel) msg;// 将来自于ServerBootstrap的child开头属性初始化到childChannel中(childHandler、childOptions、childAttrs)child.pipeline().addLast(childHandler);setChannelOptions(child, childOptions, logger);for (Entry<AttributeKey<?>, Object> e: childAttrs) {child.attr((AttributeKey<Object>) e.getKey()).set(e.getValue());}try {// 将childChannel注册到selector 需要注意的是,这里的selector与父channel所注册的selector不是同一个childGroup.register(child).addListener(new ChannelFutureListener() {@Overridepublic void operationComplete(ChannelFuture future) throws Exception {if (!future.isSuccess()) {forceClose(child, future.cause());}}});} catch (Throwable t) {forceClose(child, t);}
}
这里主要做了两件事:
- 初始化 childChannel
- 将成功从 client 连接过来的 channel 注册到 selector 上。
补充说明:
Server 端的处理上 netty 线程模型采用“服务端监听线程”和“IO线程”分离的方式。所以这里 channelRead 方法就是在 client 端请求连接到 server 端时,用于将当前连接的 IO 线程绑定到 childChannel 同时注册到 ChildGroup 中的 Selector 中。
总结就是,parentGroup处理连接,childGroup处理具体的逻辑,也就是我们添加的到pileline上的各个handler。
2.3将channel注册到selector
ChannelFuture regFuture = config().group().register(channel);这里的group是parentGroup,我们创建的是NioEventLoopGroup,所以可以找到其对应的register()方法的实现类为MultithreadEventLoopGroup,跟进去:
public ChannelFuture register(Channel channel) {// next() 从eventLoop数组中选择一个eventLoopreturn next().register(channel);
}
根据NioEventLoopGroup的继承体系,进入SingleThreadEventLoop的实现:
public ChannelFuture register(Channel channel) {// 创建一个 ChannelPromise 然后注册return register(new DefaultChannelPromise(channel, this));
}// ----> 这里继续调用 unsafe 的 register
public ChannelFuture register(final ChannelPromise promise) {ObjectUtil.checkNotNull(promise, "promise");promise.channel().unsafe().register(this, promise);return promise;
}
跟进去AbstractChannel的register()方法:
@Override
public final void register(EventLoop eventLoop, final ChannelPromise promise) {// 对异常情况的处理if (eventLoop == null) {throw new NullPointerException("eventLoop");}if (isRegistered()) {promise.setFailure(new IllegalStateException("registered to an event loop already"));return;}if (!isCompatible(eventLoop)) {promise.setFailure(new IllegalStateException("incompatible event loop type: " + eventLoop.getClass().getName()));return;}// channel与eventLoop的绑定就发生在这里,// 需要注意,这里的eventLoop还没有绑定线程,因为这个线程还没有创建AbstractChannel.this.eventLoop = eventLoop;// 判断当前线程与eventLoop所绑定线程是否是同一个线程if (eventLoop.inEventLoop()) {register0(promise);} else {try {// 执行当前线程所绑定的eventLoop的execute(), 这个execute()会将参数任务写入到任务队列,并创建启动新的线程eventLoop.execute(new Runnable() {@Overridepublic void run() {register0(promise);}});} catch (Throwable t) {logger.warn("Force-closing a channel whose registration task was not accepted by an event loop: {}",AbstractChannel.this, t);closeForcibly();closeFuture.setClosed();safeSetFailure(promise, t);}}
}
跟进去register0(promise)方法
private void register0(ChannelPromise promise) {try {if (!promise.setUncancellable() || !ensureOpen(promise)) {return;}boolean firstRegistration = neverRegistered;doRegister();  // 绑定neverRegistered = false;registered = true;pipeline.invokeHandlerAddedIfNeeded();safeSetSuccess(promise);pipeline.fireChannelRegistered();if (isActive()) {if (firstRegistration) {pipeline.fireChannelActive();} else if (config().isAutoRead()) {beginRead();}}} catch (Throwable t) {closeForcibly();closeFuture.setClosed();safeSetFailure(promise, t);}
}
跟进去AbstractNioChannel的doRegister()方法:
protected void doRegister() throws Exception {boolean selected = false;for (;;) {try {// 在这里进行了注册,将NIO原生channel注册到了NIO原生selectorselectionKey = javaChannel().register(eventLoop().unwrappedSelector(), 0, this);return;} catch (CancelledKeyException e) {if (!selected) {eventLoop().selectNow();selected = true;} else {throw e;}}}
}
这里就是 channel 注册 Selector 的代码:
selectionKey = javaChannel().register(eventLoop().unwrappedSelector(), 0, this)
- javaChannel() :这里获取原生的 Nio Channel,跟进去可以找到这里返回的是 AbstractNioChannel#ch 的 channel。在前面 NioEventGroup 初始化的时候说过这个 NIO Channel 的初始化的过程。
- 然后调用 NIO Channel 的 Regsiter 方法
- Regsiter 方法中首先传入的是 unwrappedSelector 前面初始化的 selector 数组。第二个参数 0 ,就是当前监听的的事件, 0 表示不关注任何事件。为什么这里子 Channel 注册的是不关注任何事件? 在前面看到的 Channel 注册一个指定的关注事件:SelectionKey.OP_ACCEPT 连接事件,那个 channel 是 Netty 封装的 channel,哪里监听了连接事件之后,只要关注客户端的连接,当 netty 封装的 channel 获取到连接就绪的 channel 的时候就可以拿到当前 channel 需要注册事件了,然后这个时候就可以指定 原生 NIO channel 的需要关注的事件。所以这里默认不关注任何事件就是为后续修改其需要关注指定类型的就绪事件。
接着看看AbstractChannel的register() 的eventLoop.excute()逻辑
// 在上面register的方法中
eventLoop.execute(new Runnable() {@Overridepublic void run() {register0(promise);}
});
跟进去execute()方法:
public void execute(Runnable task) {if (task == null) {throw new NullPointerException("task");}// 判断当前线程与eventLoop所绑定线程是否是同一个boolean inEventLoop = inEventLoop();// 将任务添加到任务队列addTask(task);if (!inEventLoop) {// 创建并启动一个线程startThread();if (isShutdown()) {boolean reject = false;try {if (removeTask(task)) {reject = true;}} catch (UnsupportedOperationException e) {}if (reject) {reject();}}}if (!addTaskWakesUp && wakesUpForTask(task)) {wakeup(inEventLoop);}
}
这里会执行startThread()方法,跟进去:
private void startThread() {// 若当前eventLoop所绑定线程尚未启动if (state == ST_NOT_STARTED) {if (STATE_UPDATER.compareAndSet(this, ST_NOT_STARTED, ST_STARTED)) {try {// 创建并启动一个线程doStartThread();} catch (Throwable cause) {STATE_UPDATER.set(this, ST_NOT_STARTED);PlatformDependent.throwException(cause);}}}
}
首先判断当前 eventLoop 所绑定线程尚未启动,然后使用 CAS 修改当前线程的启动状态 ,修改成功则执行doStartThread()方法,跟进去:
private void doStartThread() {assert thread == null;// 调用NioEventLoop所包含的executor的execute()// 这个execute()会创建并启动一个线程executor.execute(new Runnable() {@Overridepublic void run() {thread = Thread.currentThread();if (interrupted) {thread.interrupt();}boolean success = false;updateLastExecutionTime();try {// 执行了一个不会停止的for,用于完成任务队列中的任务SingleThreadEventExecutor.this.run();success = true;} catch (Throwable t) {logger.warn("Unexpected exception from an event executor: ", t);} finally {// 省略......}});
}
跟进去SingleThreadEventExecutor.this.run()方法:
protected void run() {for (;;) {try {try {// 选择就绪的channelswitch (selectStrategy.calculateStrategy(selectNowSupplier, hasTasks())) {case SelectStrategy.CONTINUE:    //-2 NioEventLoop不支持continue;case SelectStrategy.BUSY_WAIT:  // -3 NioEventLoop不支持case SelectStrategy.SELECT:  // -1 能走到这里,说明当前任务队列中没有任务// 进行阻塞式选择select(wakenUp.getAndSet(false));if (wakenUp.get()) {selector.wakeup();}default:}} catch (IOException e) {rebuildSelector0();handleLoopException(e);continue;}cancelledKeys = 0;needsToSelectAgain = false;// 该变量用于设置“处理就绪channel的IO所使用的时间”与“处理任务队列中任务使用时间”的比例 该值为整型,不大于100final int ioRatio = this.ioRatio;if (ioRatio == 100) {try {processSelectedKeys();} finally {runAllTasks();}} else {// 记录处理就绪channel的IO开始执行的时间点final long ioStartTime = System.nanoTime();try {// 处理就绪channel的IOprocessSelectedKeys();} finally {// 计算出处理就绪channel的IO所使用的时长final long ioTime = System.nanoTime() - ioStartTime;// 执行任务队列中的任务runAllTasks(ioTime * (100 - ioRatio) / ioRatio);}}// 省略。。。}
}
这里关注4个部分
- selectStrategy.calculateStrategy
- switch-case
- processSelectedKeys()
- runAllTasks()
1.selectStrategy.calculateStrategy()
先看下hasTasks()方法
selectStrategy.calculateStrategy(selectNowSupplier, hasTasks());// hasTasks  tailTasks 收尾任务队列
protected boolean hasTasks() {return super.hasTasks() || !tailTasks.isEmpty();
}// super.hasTasks()   taskQueue 普通任务队列
protected boolean hasTasks() {assert inEventLoop();return !taskQueue.isEmpty();
}
这里返回当前任务队列和收尾队列是否有任务
继续跟进去calculateStrategy()方法:
// SelectStrategy.SELECT = -1
public int calculateStrategy(IntSupplier selectSupplier, boolean hasTasks) throws Exception {return hasTasks ? selectSupplier.get() : SelectStrategy.SELECT;
}
IntSupplier 是匿名内部类,跟进去selectSupplier.get()方法
public int get() throws Exception {return selectNow();
}// io.netty.channel.nio.NioEventLoop#selectNow
int selectNow() throws IOException {try {return selector.selectNow();} finally {// restore wakeup state if neededif (wakenUp.get()) {selector.wakeup();}}
}
- selector.selectNow() : 方法为 NIO 的非阻塞选择,返回就绪的 channel 的数量,可以为 0。
- 补充:Selector 的阻塞选择和非阻塞选择的区别就是,非阻塞选则在当前 select 方法执行时判断循环判断所有的 channel 是否就绪并返回所有的就绪数量,而阻塞式选择则是阻塞指定时间直至阻塞时间内获取到就绪 channel 或者阻塞时间超时时立刻返回。
- wakenUp.get() : 返回当前线程是否被阻塞,没有被阻塞时返回 true,当前线程被阻塞返回 false。
- selector.wakeup() :当前线程如果被阻塞,则立刻返回 selector 结果,即唤醒当前线程。
- 这里 selectNow() 方法执行的结果,是一个必然大于等于 0 的结果。
calculateStrategy方法总结:如果任务队列存在任务,则通过 Selector 执行非阻塞选择返回就绪的 channel 数量,如果不存在任务,则直接返回 -1。
2.看下switch-case内容
switch (selectStrategy.calculateStrategy(selectNowSupplier, hasTasks())) {// 省略...   case SelectStrategy.SELECT:  // -1 能走到这里,说明当前任务队列中没有任务// 进行阻塞式选择select(wakenUp.getAndSet(false));if (wakenUp.get()) {selector.wakeup();}default:
}
当所有任务队列中都没有任务的时候才会返回 -1。也就意味着当任务队列中没有任务时也会景行一次阻塞式选择,通过 wakenUp.getAndSet(false) 方法将当前线程设置为阻塞状态。然后就阻塞式 select。
看下select()方法逻辑:
private void select(boolean oldWakenUp) throws IOException {Selector selector = this.selector;try {// 计数器:用于记录空轮询导致CPU占用率飙升,select()提前结束的次数(其值大于1时)int selectCnt = 0;// 获取当前时间,也就是for循环第一次开始执行的时间点long currentTimeNanos = System.nanoTime();// delayNanos() 表示定时任务队列中第一个定时任务还有多久就到开始执行的时间了long selectDeadLineNanos = currentTimeNanos + delayNanos(currentTimeNanos);for (;;) {// 处理小于0.5毫秒的任务long timeoutMillis = (selectDeadLineNanos - currentTimeNanos + 500000L) / 1000000L;if (timeoutMillis <= 0) {  // 该条件为true,表示具有立即需要执行的定时任务if (selectCnt == 0) {  // 只有第一次for循环才会执行下面的“非阻塞选择”selector.selectNow();selectCnt = 1;}break;}if (hasTasks() && wakenUp.compareAndSet(false, true)) {selector.selectNow();selectCnt = 1;break;}int selectedKeys = selector.select(timeoutMillis);selectCnt ++;// 若有就绪的channel了,则直接结束if (selectedKeys != 0 || oldWakenUp || wakenUp.get() || hasTasks() || hasScheduledTasks()) {break;}// 若当前线程被中断if (Thread.interrupted()) {selectCnt = 1;break;}// 获取当前时间long time = System.nanoTime();// 下面的式子等价于:  time - currentTimeNanos >= timeoutMillis// 若下面的条件成立,则说明select()是在指定的阻塞时间过期后才跳出的,即正常结束的if (time - TimeUnit.MILLISECONDS.toNanos(timeoutMillis) >= currentTimeNanos) {// timeoutMillis elapsed without anything selected.selectCnt = 1;} else if (SELECTOR_AUTO_REBUILD_THRESHOLD > 0 &&selectCnt >= SELECTOR_AUTO_REBUILD_THRESHOLD) {selector = selectRebuildSelector(selectCnt);  // 重构selectorselectCnt = 1;break;}// 本轮for循环结束时间点,同时也是下一轮for循环的开始时间点currentTimeNanos = time;}  } catch (CancelledKeyException e) {}
}
switch-case 唯一的代码逻辑也就是在任务队列中没有任务时执行的阻塞 select,而在其他的任何情况下或者阻塞选择存在就绪 channel 或者任务队列新增任务之后都会跳出 switch - case,执行后续逻辑。
3.processSelectedKeys()
进入processSelectedKeys()方法:
private void processSelectedKeys() {// 判断channel的selectedKeys是否是优化过的if (selectedKeys != null) {processSelectedKeysOptimized();  // 优化处理方式} else {processSelectedKeysPlain(selector.selectedKeys());  // 普通处理方式}
}
优化部分的在《Netty中NioEventLoop介绍》中有讲过了,就是将selectedKeys 的 set 集合转换成了数组。
跟进去processSelectedKeysOptimized()方法:
private void processSelectedKeysOptimized() {for (int i = 0; i < selectedKeys.size; ++i) {// 从数组中取出一个元素final SelectionKey k = selectedKeys.keys[i];// 移除已经取出的 SelectionKey,使 GC 可以处理到已经关闭的 channelselectedKeys.keys[i] = null;// 获取selectionKey的附件,该附件中可以存放任意数据,不过这里存放的是NIO原生channelfinal Object a = k.attachment();if (a instanceof AbstractNioChannel) {processSelectedKey(k, (AbstractNioChannel) a);  // 处理就绪事件} else {NioTask<SelectableChannel> task = (NioTask<SelectableChannel>) a;processSelectedKey(k, task); // 这里是测试代码。跟进去可以看到实现方法是测试类}
// 省略......
跟进去processSelectedKey()方法:
private void processSelectedKey(SelectionKey k, AbstractNioChannel ch) {final AbstractNioChannel.NioUnsafe unsafe = ch.unsafe();// 处理selectionKey失效的情况if (!k.isValid()) {final EventLoop eventLoop;try {eventLoop = ch.eventLoop();} catch (Throwable ignored) {return;}if (eventLoop != this || eventLoop == null) {return;}unsafe.close(unsafe.voidPromise());return;}try {int readyOps = k.readyOps();// 判断当前 channnel 就绪的事件类型if ((readyOps & SelectionKey.OP_CONNECT) != 0) {// 获取当前selectionKey的interestOpsint ops = k.interestOps();// 先将SelectionKey.OP_CONNECT按位取或,再与ops进行按位与ops &= ~SelectionKey.OP_CONNECT;// 将修改过的ops再写入到selectionsKey中k.interestOps(ops);// 连接serverunsafe.finishConnect();}// 处理写就绪的情况if ((readyOps & SelectionKey.OP_WRITE) != 0) {// 强制刷新(将user buffer中的数据写入到网关缓存)ch.unsafe().forceFlush();}// readyOps为0表示当前没有任何channel就绪if ((readyOps & (SelectionKey.OP_READ | SelectionKey.OP_ACCEPT)) != 0 || readyOps == 0) {// 将网卡缓存中的数据写入到user bufferunsafe.read();}} catch (CancelledKeyException ignored) {unsafe.close(unsafe.voidPromise());}
}
这就是完整的 IO 处理逻辑,主要根据当前 channel 关注的事件进行相应的 unsafe 操作。
4.runAllTasks()
看下runAllTasks:
runAllTasks(ioTime * (100 - ioRatio) / ioRatio);protected boolean runAllTasks(long timeoutNanos) {// 从定时任务队列中取出所有当前马上就要到期的定时任务放入到任务队列fetchFromScheduledTaskQueue();// 从任务队列中取出一个任务Runnable task = pollTask();// 若该任务为空,则说明任务队列中已经没有任务了,此时就可以执行收尾任务了if (task == null) {// 执行收尾队列中的收尾任务afterRunningAllTasks();return false;}final long deadline = ScheduledFutureTask.nanoTime() + timeoutNanos;// 计数器long runTasks = 0;long lastExecutionTime;for (;;) {// 执行任务safeExecute(task);runTasks ++;// 每64个任务查看一次超时if ((runTasks & 0x3F) == 0) {lastExecutionTime = ScheduledFutureTask.nanoTime();if (lastExecutionTime >= deadline) {break;}}// 从任务队列中再取出一个任务task = pollTask();if (task == null) {lastExecutionTime = ScheduledFutureTask.nanoTime();break;}} // end-for// 处理收尾队列中的任务afterRunningAllTasks();this.lastExecutionTime = lastExecutionTime;return true;
}到这里,initAndRegister()方法就介绍完成了,接着往下看
3.doBind0() 绑定端口号
进入doBind0()方法
private static void doBind0(final ChannelFuture regFuture, final Channel channel,final SocketAddress localAddress, final ChannelPromise promise) {channel.eventLoop().execute(new Runnable() {@Overridepublic void run() {if (regFuture.isSuccess()) {  // 只有当channel初始化注册成功后,才会进行绑定channel.bind(localAddress, promise).addListener(ChannelFutureListener.CLOSE_ON_FAILURE);} else {promise.setFailure(regFuture.cause());}}});
}
进入bind()方法
public ChannelFuture bind(SocketAddress localAddress, ChannelPromise promise) {return pipeline.bind(localAddress, promise);
}// 接着进入bind()方法public final ChannelFuture bind(SocketAddress localAddress, ChannelPromise promise) {return tail.bind(localAddress, promise);
}
继续进入bind()方法:
public ChannelFuture bind(final SocketAddress localAddress, final ChannelPromise promise) {if (localAddress == null) {throw new NullPointerException("localAddress");}if (isNotValidPromise(promise, false)) {// cancelledreturn promise;}final AbstractChannelHandlerContext next = findContextOutbound(MASK_BIND);EventExecutor executor = next.executor();if (executor.inEventLoop()) {next.invokeBind(localAddress, promise);} else {safeExecute(executor, new Runnable() {@Overridepublic void run() {next.invokeBind(localAddress, promise);}}, promise, null);}return promise;
}
进入invokeBind()方法:
private void invokeBind(SocketAddress localAddress, ChannelPromise promise) {if (invokeHandler()) {try {((ChannelOutboundHandler) handler()).bind(this, localAddress, promise);} catch (Throwable t) {notifyOutboundHandlerException(t, promise);}} else {bind(localAddress, promise);}
}
接着跟进bind()方法,实现为io.netty.channel.DefaultChannelPipeline.HeadContext
public void bind(ChannelHandlerContext ctx, SocketAddress localAddress, ChannelPromise promise) {unsafe.bind(localAddress, promise);
}
接着跟进去bind()方法,实现类io.netty.channel.AbstractChannel.AbstractUnsafe
public final void bind(final SocketAddress localAddress, final ChannelPromise promise) {// 省略。。。// 获取当前channel是否被激活。注意,现在还没有被激活,所以其值为falseboolean wasActive = isActive();try {// 绑定doBind(localAddress);} catch (Throwable t) {safeSetFailure(promise, t);closeIfClosed();return;}if (!wasActive && isActive()) {invokeLater(new Runnable() {@Overridepublic void run() {pipeline.fireChannelActive();  // 触发重写的channelActivate方法的执行}});}safeSetSuccess(promise);
}
进入doBind()方法,实现类NioServerSocketChannel
protected void doBind(SocketAddress localAddress) throws Exception {if (PlatformDependent.javaVersion() >= 7) {javaChannel().bind(localAddress, config.getBacklog());} else {javaChannel().socket().bind(localAddress, config.getBacklog());}
}
javaChannel() 即获取 NIO 原生 channel 的方法,再获取到 NIO 原生 channel 之后调用 bind 方法完成绑定。
这里涉及了pileline的一些操作,在这里不展开
总结
这里介绍了ServerBootstarp类实例化,属性设置以及bind端口的一些操作,Bootstrap类的流程和ServerBootstarp类似,但简单一些,后面又时间再整理。
参考博文:博文地址