社区网站建设公司/100个商业经典案例
写在前面的话
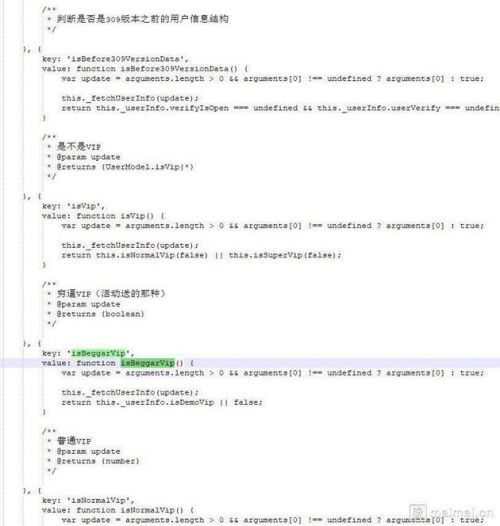
今天看到一个新闻,关于虾米音乐的程序员写的注释。
好像图都绿了,突然间想起在我曾经老大的影响下,我的Log输出已经变成了fxxk。。这样不好,不好。要改的,改改改。

1. 从WindowManager的addView说起
上次我们大致分析了Activity从创建到显示的过程,当时只是简单分析了下。最终的显示过程还是通过WindowManager的addView添加到Window上的。WindowManager是个接口,继承了ViewManager,其最终的实现类是WindowManagerImpl,先来看下WindowManagerImpl的addView方法。
ActivityThread.java
if (a.mVisibleFromClient && !a.mWindowAdded) {a.mWindowAdded = true;wm.addView(decor, l);
}
WindowManagerImpl.java
@Override
public void addView(@NonNull View view, @NonNull ViewGroup.LayoutParams params) {applyDefaultToken(params);//调用了WindowManagerGlobal的addView方法mGlobal.addView(view, params, mContext.getDisplay(), mParentWindow);
}
private void applyDefaultToken(@NonNull ViewGroup.LayoutParams params) {// Only use the default token if we don't have a parent window.if (mDefaultToken != null && mParentWindow == null) {//判断paramsif (!(params instanceof WindowManager.LayoutParams)) {throw new IllegalArgumentException("Params must be WindowManager.LayoutParams");}// Only use the default token if we don't already have a token.//给params设置tokenfinal WindowManager.LayoutParams wparams = (WindowManager.LayoutParams) params;if (wparams.token == null) {wparams.token = mDefaultToken;}}
}
上面的代码是先给当前的params设置了token,接着调用了WindowManagerGlobal的
addView方法。
2. WindowManagerGlobal的addView方法
上面说到我们对当前的params设置了token,接下来调用了WindowManagerGlobal的
addView方法。
在WindowManagerGlobal的addView方法中,首先进行的是对参数的校验,包括了类型以及null的校验。如果不通过,则throw Exception。接着在缓存的view中去寻找当前的decorView是否已经存在,如果已经存在则需要判断其是否正在“死亡”,如果不是,这抛出异常。接着需要根据LayoutParams的type来判断窗口的类型,默认的是TYPE_APPLICATION即普通应用窗口类型。如果是子窗口类型,则需要根据其token来查找其父窗口。接着需要创建ViewRootImpl对象,并将decorView、root、wparams以及添加到缓存中。下面是代码:
WindowManagerGlobal.java
public void addView(View view, ViewGroup.LayoutParams params,Display display, Window parentWindow) {//参数检查if (view == null) {throw new IllegalArgumentException("view must not be null");}if (display == null) {throw new IllegalArgumentException("display must not be null");}if (!(params instanceof WindowManager.LayoutParams)) {throw new IllegalArgumentException("Params must be WindowManager.LayoutParams");}final WindowManager.LayoutParams wparams = (WindowManager.LayoutParams) params;if (parentWindow != null) {parentWindow.adjustLayoutParamsForSubWindow(wparams);} else {// If there's no parent, then hardware acceleration for this view is// set from the application's hardware acceleration setting.final Context context = view.getContext();if (context != null&& (context.getApplicationInfo().flags& ApplicationInfo.FLAG_HARDWARE_ACCELERATED) != 0) {wparams.flags |= WindowManager.LayoutParams.FLAG_HARDWARE_ACCELERATED;}}ViewRootImpl root;View panelParentView = null;synchronized (mLock) {//添加系统属性改变的callback// Start watching for system property changes.if (mSystemPropertyUpdater == null) {mSystemPropertyUpdater = new Runnable() {@Override public void run() {synchronized (mLock) {for (int i = mRoots.size() - 1; i >= 0; --i) {mRoots.get(i).loadSystemProperties();}}}};SystemProperties.addChangeCallback(mSystemPropertyUpdater);}//从缓存的view中寻找是否当前的decorView已经存在int index = findViewLocked(view, false);//index >= 0 则说明已经存在了,所以需要去让它销毁if (index >= 0) {//正在销毁的view中是否包含,如果有的话,调用其doDie()方法if (mDyingViews.contains(view)) {// Don't wait for MSG_DIE to make it's way through root's queue.mRoots.get(index).doDie();} else {//抛出异常throw new IllegalStateException("View " + view+ " has already been added to the window manager.");}// The previous removeView() had not completed executing. Now it has.}// If this is a panel window, then find the window it is being// attached to for future reference.// 判断当前的LayoutParams的type的类型,如果它是子窗口,那么需要去找到它的父窗口if (wparams.type >= WindowManager.LayoutParams.FIRST_SUB_WINDOW &&wparams.type <= WindowManager.LayoutParams.LAST_SUB_WINDOW) {final int count = mViews.size();for (int i = 0; i < count; i++) {if (mRoots.get(i).mWindow.asBinder() == wparams.token) {panelParentView = mViews.get(i);}}}//创建ViewRootImplroot = new ViewRootImpl(view.getContext(), display);//设置LayoutParamsview.setLayoutParams(wparams);//添加到缓存中mViews.add(view);mRoots.add(root);mParams.add(wparams);}// do this last because it fires off messages to start doing thingstry {//通过ViewRootImpl去设置view,传入decorView,LayoutParams以及父窗口root.setView(view, wparams, panelParentView);} catch (RuntimeException e) {// BadTokenException or InvalidDisplayException, clean up.synchronized (mLock) {final int index = findViewLocked(view, false);if (index >= 0) {removeViewLocked(index, true);}}throw e;}
}
3. ViewRootImpl的setView方法
ViewRootImpl的setView方法比较长,前一部分不用多说,其中有一部分比较重要的是对
mSurfaceHolderCallback的赋值操作。这里面需要看到的是DecorView extends FrameLayout implements RootViewSurfaceTaker,但是willYouTakeTheSurface这个方法返回的默认是null,如果需要设置可以在Activity中使用getWindow().takeSurface()设置。接着调用了requestLayout()方法,去请求开始布局,这里面通过编舞者Choreographer来进行的异步操作,整个过程也比较繁琐。后面是对输入通道的建立,通过Session将IWindow添加到WMS中。
public void setView(View view, WindowManager.LayoutParams attrs, View panelParentView) {synchronized (this) {if (mView == null) {mView = view;mAttachInfo.mDisplayState = mDisplay.getState();mDisplayManager.registerDisplayListener(mDisplayListener, mHandler);mViewLayoutDirectionInitial = mView.getRawLayoutDirection();mFallbackEventHandler.setView(view);mWindowAttributes.copyFrom(attrs);if (mWindowAttributes.packageName == null) {mWindowAttributes.packageName = mBasePackageName;}attrs = mWindowAttributes;setTag();// Keep track of the actual window flags supplied by the client.mClientWindowLayoutFlags = attrs.flags;setAccessibilityFocus(null, null);//当前的view是decorView,而通过源码可以看到   DecorView extends FrameLayout implements RootViewSurfaceTaker, WindowCallbacks//所以这个条件成立,不过willYouTakeTheSurface这个方法去获得Callback2的时,//实际上获取的是PhoneWindow的mTakeSurfaceCallback,这个mTakeSurfaceCallback的设置是通过getWindow().takeSurface()这种方式设置。if (view instanceof RootViewSurfaceTaker) {//默认的为nullmSurfaceHolderCallback =((RootViewSurfaceTaker)view).willYouTakeTheSurface();if (mSurfaceHolderCallback != null) {mSurfaceHolder = new TakenSurfaceHolder();mSurfaceHolder.setFormat(PixelFormat.UNKNOWN);}}// Compute surface insets required to draw at specified Z value.// TODO: Use real shadow insets for a constant max Z.if (!attrs.hasManualSurfaceInsets) {attrs.setSurfaceInsets(view, false /*manual*/, true /*preservePrevious*/);}CompatibilityInfo compatibilityInfo =mDisplay.getDisplayAdjustments().getCompatibilityInfo();mTranslator = compatibilityInfo.getTranslator();//如果这个应用没有拥有自己的surface,那么需要开启硬件加速// If the application owns the surface, don't enable hardware accelerationif (mSurfaceHolder == null) {enableHardwareAcceleration(attrs);}......//设置为已经添加mAdded = true;int res; /* = WindowManagerImpl.ADD_OKAY; */// Schedule the first layout -before- adding to the window// manager, to make sure we do the relayout before receiving// any other events from the system.//开始请求layout,layout的过程是通过编舞者Choreographer来进行的异步操作requestLayout();// 输入通道的建立if ((mWindowAttributes.inputFeatures& WindowManager.LayoutParams.INPUT_FEATURE_NO_INPUT_CHANNEL) == 0) {mInputChannel = new InputChannel();}mForceDecorViewVisibility = (mWindowAttributes.privateFlags& PRIVATE_FLAG_FORCE_DECOR_VIEW_VISIBILITY) != 0;try {mOrigWindowType = mWindowAttributes.type;mAttachInfo.mRecomputeGlobalAttributes = true;collectViewAttributes();//通过windowSession添加显示,这里面主要是创建SurfaceSession,SurfaceSession用来连接surface flinger//后面会通过native创建SurfaceControl时当作参数传入res = mWindowSession.addToDisplay(mWindow, mSeq, mWindowAttributes,getHostVisibility(), mDisplay.getDisplayId(),mAttachInfo.mContentInsets, mAttachInfo.mStableInsets,mAttachInfo.mOutsets, mInputChannel);} catch (RemoteException e) {mAdded = false;mView = null;mAttachInfo.mRootView = null;mInputChannel = null;mFallbackEventHandler.setView(null);unscheduleTraversals();setAccessibilityFocus(null, null);throw new RuntimeException("Adding window failed", e);} finally {if (restore) {attrs.restore();}}if (mTranslator != null) {mTranslator.translateRectInScreenToAppWindow(mAttachInfo.mContentInsets);}mPendingOverscanInsets.set(0, 0, 0, 0);mPendingContentInsets.set(mAttachInfo.mContentInsets);mPendingStableInsets.set(mAttachInfo.mStableInsets);mPendingVisibleInsets.set(0, 0, 0, 0);mAttachInfo.mAlwaysConsumeNavBar =(res & WindowManagerGlobal.ADD_FLAG_ALWAYS_CONSUME_NAV_BAR) != 0;mPendingAlwaysConsumeNavBar = mAttachInfo.mAlwaysConsumeNavBar;if (DEBUG_LAYOUT) Log.v(mTag, "Added window " + mWindow);// 返回的结果不是成功,则根据结果抛出异常if (res < WindowManagerGlobal.ADD_OKAY) {mAttachInfo.mRootView = null;mAdded = false;mFallbackEventHandler.setView(null);unscheduleTraversals();setAccessibilityFocus(null, null);switch (res) {......}throw new RuntimeException("Unable to add window -- unknown error code " + res);}// 输入事件的callback,一般情况下都为nullif (view instanceof RootViewSurfaceTaker) {mInputQueueCallback =((RootViewSurfaceTaker)view).willYouTakeTheInputQueue();}// 注册输入事件的监听if (mInputChannel != null) {if (mInputQueueCallback != null) {mInputQueue = new InputQueue();mInputQueueCallback.onInputQueueCreated(mInputQueue);}mInputEventReceiver = new WindowInputEventReceiver(mInputChannel,Looper.myLooper());}//让当前的ViewRootImpl成为view的父亲。。view.assignParent(this);mAddedTouchMode = (res & WindowManagerGlobal.ADD_FLAG_IN_TOUCH_MODE) != 0;mAppVisible = (res & WindowManagerGlobal.ADD_FLAG_APP_VISIBLE) != 0;if (mAccessibilityManager.isEnabled()) {mAccessibilityInteractionConnectionManager.ensureConnection();}if (view.getImportantForAccessibility() == View.IMPORTANT_FOR_ACCESSIBILITY_AUTO) {view.setImportantForAccessibility(View.IMPORTANT_FOR_ACCESSIBILITY_YES);}// Set up the input pipeline.......}}
}
4. Session的addToDisplay
Session的addToDisplay方法调用WMS的addWindow方法,WMS中的addWindow主要是创建了一个WindowState对象,通过其
attach方法调用Session中的windowAddedLocked方法创建SurfaceSession,通过SurfaceSession可以和surface flinger连接。
Session.java:
@Override
public int addToDisplay(IWindow window, int seq, WindowManager.LayoutParams attrs,int viewVisibility, int displayId, Rect outContentInsets, Rect outStableInsets,Rect outOutsets, InputChannel outInputChannel) {return mService.addWindow(this, window, seq, attrs, viewVisibility, displayId,outContentInsets, outStableInsets, outOutsets, outInputChannel);
}WMS:
public int addWindow(Session session, IWindow client, int seq,WindowManager.LayoutParams attrs, int viewVisibility, int displayId,Rect outContentInsets, Rect outStableInsets, Rect outOutsets,InputChannel outInputChannel) {int[] appOp = new int[1];//权限检查实现类WindowManagerPolicyint res = mPolicy.checkAddPermission(attrs, appOp);if (res != WindowManagerGlobal.ADD_OKAY) {return res;}boolean reportNewConfig = false;WindowState parentWindow = null;long origId;final int callingUid = Binder.getCallingUid();final int type = attrs.type;synchronized(mWindowMap) {//错误处理......AppWindowToken atoken = null;final boolean hasParent = parentWindow != null;// Use existing parent window token for child windows since they go in the same token// as there parent window so we can apply the same policy on them.WindowToken token = displayContent.getWindowToken(hasParent ? parentWindow.mAttrs.token : attrs.token);// If this is a child window, we want to apply the same type checking rules as the// parent window type.final int rootType = hasParent ? parentWindow.mAttrs.type : type;boolean addToastWindowRequiresToken = false;if (token == null) {//错误处理......final IBinder binder = attrs.token != null ? attrs.token : client.asBinder();token = new WindowToken(this, binder, type, false, displayContent,session.mCanAddInternalSystemWindow);} else if (rootType >= FIRST_APPLICATION_WINDOW && rootType <= LAST_APPLICATION_WINDOW) {atoken = token.asAppWindowToken();......} ......//错误处理} else if (token.asAppWindowToken() != null) {attrs.token = null;token = new WindowToken(this, client.asBinder(), type, false, displayContent,session.mCanAddInternalSystemWindow);}//创建WindowState,final WindowState win = new WindowState(this, session, client, token, parentWindow,appOp[0], seq, attrs, viewVisibility, session.mUid,session.mCanAddInternalSystemWindow);......//开启输入通道final boolean openInputChannels = (outInputChannel != null&& (attrs.inputFeatures & INPUT_FEATURE_NO_INPUT_CHANNEL) == 0);if  (openInputChannels) {win.openInputChannel(outInputChannel);}//关于toast的一个处理......res = WindowManagerGlobal.ADD_OKAY;if (mCurrentFocus == null) {mWinAddedSinceNullFocus.add(win);}if (excludeWindowTypeFromTapOutTask(type)) {displayContent.mTapExcludedWindows.add(win);}origId = Binder.clearCallingIdentity();//调用了WindowState的attach方法,下面有讲解win.attach();//将WindowState和传入的IWindow保存到mWindowMap中mWindowMap.put(client.asBinder(), win);......return res;
}WindowState.java:
void attach() {if (localLOGV) Slog.v(TAG, "Attaching " + this + " token=" + mToken);mSession.windowAddedLocked(mAttrs.packageName);
}Session.java:
void windowAddedLocked(String packageName) {//设置包名mPackageName = packageName;mRelayoutTag = "relayoutWindow: " + mPackageName;if (mSurfaceSession == null) {//创建SurfaceSession与surface flinger连接mSurfaceSession = new SurfaceSession();mService.mSessions.add(this);if (mLastReportedAnimatorScale != mService.getCurrentAnimatorScale()) {mService.dispatchNewAnimatorScaleLocked(this);}}mNumWindow++;
}
SurfaceSession是通过native层创建的,能力不够,不做分析。
6. Choreographer的TraversalRunnable异步方法执行
ViewRootImpl中的Choreographer通过postCallback方式实现异步的遍历操作,Choreographer会在底层接收VSYNC(垂直同步)信号,接收垂直同步信号后会根据类型来判断具体操作。这里是遍历操作,会调用TraversalRunnable的run方法,run方法中调用了ViewRootImpl的doTraversal方法,doTraversal方法调用了performTraversals()方法。performTraversals()这里面就是真正的遍历操作。简化一下代码(代码太多了),这里面主要分为四部分:
relayoutWindow,这里会创建SurfaceControl,并且将之前的SurfaceSession当作参数传入。- 调用
performMeasure方法,对View进行测量。- 调用
performLayout对View的进行布局。- 调用
performDraw进行绘制。
final class TraversalRunnable implements Runnable {@Overridepublic void run() {doTraversal();}
}void doTraversal() {......performTraversals();......
}private void performTraversals() {// cache mView since it is used so much below...final View host = mView;......try {......//重新布局window,主要是surface的创建relayoutResult = relayoutWindow(params, viewVisibility, insetsPending);......} ......if (!mStopped || mReportNextDraw) {......// Ask host how big it wants to be//测量performMeasure(childWidthMeasureSpec, childHeightMeasureSpec);......}......if (didLayout) {//布局performLayout(lp, mWidth, mHeight);......}......if (!cancelDraw && !newSurface) {//绘制performDraw();}
}
6.1 relayoutWindow的过程
这里的过程是比较多的,分步来说:
- 调用Session的relayout
ViewRootImpl.java:
private int relayoutWindow(WindowManager.LayoutParams params, int viewVisibility,boolean insetsPending) throws RemoteException {......//这里还是通过Session进行relayout,可以猜想Session中会调用WMS方法进行真正relayout//这里说下参数mSurface即Surface对象,这个对象是java层直接new出来的一个对象,并没有其他操作。//后面通过new SurfaceControl创建Surface并通过surfaceController.getSurface(outSurface)获得真正的Surfaceint relayoutResult = mWindowSession.relayout(mWindow, mSeq, params,(int) (mView.getMeasuredWidth() * appScale + 0.5f),(int) (mView.getMeasuredHeight() * appScale + 0.5f),viewVisibility, insetsPending ? WindowManagerGlobal.RELAYOUT_INSETS_PENDING : 0,mWinFrame, mPendingOverscanInsets, mPendingContentInsets, mPendingVisibleInsets,mPendingStableInsets, mPendingOutsets, mPendingBackDropFrame, mPendingConfiguration,mSurface);......return relayoutResult;
}
- Sessoin中的relayout又去调用WMS中的relayoutWindow方法(每次都是这个套路)
Session.java:
public int relayout(IWindow window, int seq, WindowManager.LayoutParams attrs,int requestedWidth, int requestedHeight, int viewFlags,int flags, Rect outFrame, Rect outOverscanInsets, Rect outContentInsets,Rect outVisibleInsets, Rect outStableInsets, Rect outsets, Rect outBackdropFrame,MergedConfiguration mergedConfiguration, Surface outSurface) {//果不其然,调用了WMS的relayoutWindow方法,int res = mService.relayoutWindow(this, window, seq, attrs,requestedWidth, requestedHeight, viewFlags, flags,outFrame, outOverscanInsets, outContentInsets, outVisibleInsets,outStableInsets, outsets, outBackdropFrame, mergedConfiguration, outSurface);return res;
}
- WMS的relayoutWindow方法通过createSurfaceControl创建SurfaceControl,并通过WindowSurfaceController.getSurface将传入的参数Surface真正赋值(copyFrom)
WMS:
public int relayoutWindow(Session session, IWindow client, int seq,WindowManager.LayoutParams attrs, int requestedWidth,int requestedHeight, int viewVisibility, int flags,Rect outFrame, Rect outOverscanInsets, Rect outContentInsets,Rect outVisibleInsets, Rect outStableInsets, Rect outOutsets, Rect outBackdropFrame,MergedConfiguration mergedConfiguration, Surface outSurface) {......result = win.relayoutVisibleWindow(mergedConfiguration, result, attrChanges,oldVisibility);try {// 这里创建了SurfaceControlresult = createSurfaceControl(outSurface, result, win, winAnimator);} catch (Exception e) {mInputMonitor.updateInputWindowsLw(true /*force*/);Slog.w(TAG_WM, "Exception thrown when creating surface for client "+ client + " (" + win.mAttrs.getTitle() + ")",e);Binder.restoreCallingIdentity(origId);return 0;}......Binder.restoreCallingIdentity(origId);return result;
}WindowStateAnimator.java:
WindowSurfaceController createSurfaceLocked(int windowType, int ownerUid) {......try {// 创建WindowSurfaceController,可以看到这里面的参数有Session中的SurfaceSession对象// 之前也说过,SurfaceSession用来连接Surface flingler,所以我觉得这里Surface和Surface flinger是通过SurfaceSession连接。mSurfaceController = new WindowSurfaceController(mSession.mSurfaceSession,attrs.getTitle().toString(),width, height, format, flags, this, windowType, ownerUid);......} catch (OutOfResourcesException e) {Slog.w(TAG, "OutOfResourcesException creating surface");mService.mRoot.reclaimSomeSurfaceMemory(this, "create", true);mDrawState = NO_SURFACE;return null;} catch (Exception e) {Slog.e(TAG, "Exception creating surface", e);mDrawState = NO_SURFACE;return null;}......return mSurfaceController;
}
- createSurfaceControl方法通过调用WindowStateAnimator的createSurfaceLocked方法去创建WindowSurfaceController
WMS:
private int createSurfaceControl(Surface outSurface, int result, WindowState win,WindowStateAnimator winAnimator) {......try {// 创建createSurfaceLockedsurfaceController = winAnimator.createSurfaceLocked(win.mAttrs.type, win.mOwnerUid);} ......if (surfaceController != null) {// 通过Surface.copyFrom方法获得真正的SurfacesurfaceController.getSurface(outSurface);} else {......outSurface.release();}return result;
}
- WindowSurfaceController的创建过程中通过判断当前是否处于debug状态来判断创建具体的SurfaceControl
WindowSurfaceController.java:
public WindowSurfaceController(SurfaceSession s, String name, int w, int h, int format,int flags, WindowStateAnimator animator, int windowType, int ownerUid) {......//创建SurfaceControl,从名字可以看出这是控制Surface的类,当然了参数也包括了之前的SurfaceSession对象mSurfaceControl = new SurfaceControl(s, name, w, h, format, flags, windowType, ownerUid);......
}
- SurfaceControl的具体创建过程是通过nativeCreate方法创建,当然了参数包括了之前的SurfaceSession对象,之前也说过,SurfaceSession用来连接Surface flingler,所以我觉得这里Surface和Surface flinger是通过SurfaceSession连接。
SurfaceControl.java:
public SurfaceControl(SurfaceSession session,String name, int w, int h, int format, int flags)throws OutOfResourcesException {if (session == null) {throw new IllegalArgumentException("session must not be null");}if (name == null) {throw new IllegalArgumentException("name must not be null");}mName = name;// 通过native方法创建,参数是名称 SurfaceSession 宽 高等// 具体创建还是不清楚。。mNativeObject = nativeCreate(session, name, w, h, format, flags);if (mNativeObject == 0) {throw new OutOfResourcesException("Couldn't allocate SurfaceControl native object");}mCloseGuard.open("release");
}
执行完relayoutWindow后,我们的
mSurface对象不再是一个空洞洞的对象,而是一个真正的"“Surface”对象。
6.2 performMeasure方法
performMeasure方法执行很简单,就是调用了View的measure方法。
private void performMeasure(int childWidthMeasureSpec, int childHeightMeasureSpec) {Trace.traceBegin(Trace.TRACE_TAG_VIEW, "measure");try {//调用了View的measure方法,参数是长和宽的测量规格mView.measure(childWidthMeasureSpec, childHeightMeasureSpec);} finally {Trace.traceEnd(Trace.TRACE_TAG_VIEW);}
}
关于View的measure这里不多说。
6.3 performLayout方法
performLayout主要是调用了View的layout方法,由于DecorView是FrameLayout的子类,FrameLayout又是ViewGroup的子类,而且ViewGroup的layout是final方法,所以最后调用的是ViewGroup的layout方法,满足条件的话,最后会调用View的layout方法。
private void performLayout(WindowManager.LayoutParams lp, int desiredWindowWidth,int desiredWindowHeight) {mLayoutRequested = false;mScrollMayChange = true;// 在布局过程中mInLayout = true;final View host = mView;if (DEBUG_ORIENTATION || DEBUG_LAYOUT) {Log.v(mTag, "Laying out " + host + " to (" +host.getMeasuredWidth() + ", " + host.getMeasuredHeight() + ")");}Trace.traceBegin(Trace.TRACE_TAG_VIEW, "layout");try {// 调用View(decorView)的layout方法host.layout(0, 0, host.getMeasuredWidth(), host.getMeasuredHeight());// 不在布局过程中了mInLayout = false;int numViewsRequestingLayout = mLayoutRequesters.size();if (numViewsRequestingLayout > 0) {// 这个注释很清楚了,这里在布局的过程中主要是requestLayout()这个方法被调用了。// requestLayout() 这个方法会调用ViewRootImpl的requestLayoutDuringLayout方法,将自己添加到list中// 这时候numViewsRequestingLayout > 0执行下面的操作// requestLayout() was called during layout.// If no layout-request flags are set on the requesting views, there is no problem.// If some requests are still pending, then we need to clear those flags and do// a full request/measure/layout pass to handle this situation.ArrayList<View> validLayoutRequesters = getValidLayoutRequesters(mLayoutRequesters,false);if (validLayoutRequesters != null) {// Set this flag to indicate that any further requests are happening during// the second pass, which may result in posting those requests to the next// frame insteadmHandlingLayoutInLayoutRequest = true;// Process fresh layout requests, then measure and layoutint numValidRequests = validLayoutRequesters.size();for (int i = 0; i < numValidRequests; ++i) {final View view = validLayoutRequesters.get(i);Log.w("View", "requestLayout() improperly called by " + view +" during layout: running second layout pass");view.requestLayout();}measureHierarchy(host, lp, mView.getContext().getResources(),desiredWindowWidth, desiredWindowHeight);mInLayout = true;host.layout(0, 0, host.getMeasuredWidth(), host.getMeasuredHeight());mHandlingLayoutInLayoutRequest = false;// Check the valid requests again, this time without checking/clearing the// layout flags, since requests happening during the second pass get noop'dvalidLayoutRequesters = getValidLayoutRequesters(mLayoutRequesters, true);if (validLayoutRequesters != null) {final ArrayList<View> finalRequesters = validLayoutRequesters;// Post second-pass requests to the next framegetRunQueue().post(new Runnable() {@Overridepublic void run() {int numValidRequests = finalRequesters.size();for (int i = 0; i < numValidRequests; ++i) {final View view = finalRequesters.get(i);Log.w("View", "requestLayout() improperly called by " + view +" during second layout pass: posting in next frame");view.requestLayout();}}});}}}} finally {Trace.traceEnd(Trace.TRACE_TAG_VIEW);}mInLayout = false;
}
6.4 performDraw的过程
前面说了那么多,也没轮到绘制的过程。当测量完成,布局完成,接下来便是真正的绘制的过程——performDraw。
整个绘制过程分为了中不同的绘制过程,我看了很多博客,基本上分析的都是软件绘制。但是,Android 4.0就已经默认开启硬件加速了,所以这里重点说下硬件绘制(不会涉及native层)。
硬件加速的渲染过程:
- 在ViewRootImpl的draw方法中,如果开启了硬件加速会调用ThreadedRenderer的draw方法去绘制。
ViewRootImpl.java:
private void performDraw() {......try {draw(fullRedrawNeeded);} finally {mIsDrawing = false;Trace.traceEnd(Trace.TRACE_TAG_VIEW);}......try {mWindowSession.finishDrawing(mWindow);} catch (RemoteException e) {}
}private void draw(boolean fullRedrawNeeded) {// 设置属性和接口回调部分......mAttachInfo.mDrawingTime =mChoreographer.getFrameTimeNanos() / TimeUtils.NANOS_PER_MS;if (!dirty.isEmpty() || mIsAnimating || accessibilityFocusDirty) {// 开启了硬件加速,之前说过 如果没有自己的SurfaceView则开启硬件加速,所以最终会执行这部分代码if (mAttachInfo.mHardwareRenderer != null && mAttachInfo.mHardwareRenderer.isEnabled()) {......// ThreadedRenderer的draw方法mAttachInfo.mHardwareRenderer.draw(mView, mAttachInfo, this);} else {......// 没有开启硬件加速,软件绘制if (!drawSoftware(surface, mAttachInfo, xOffset, yOffset, scalingRequired, dirty)) {return;}}}......
}
- ThreadedRenderer调用updateRootDisplayList更新跟显示列表。
ThreadedRenderer.java:
void draw(View view, AttachInfo attachInfo, HardwareDrawCallbacks callbacks) {attachInfo.mIgnoreDirtyState = true;final Choreographer choreographer = attachInfo.mViewRootImpl.mChoreographer;choreographer.mFrameInfo.markDrawStart();// 更新根显示列表updateRootDisplayList(view, callbacks);......
}
- updateRootDisplayList调用View.updateDisplayListIfDirty方法获得RenderNode对象,通过DisplayListCanvas.drawRenderNode方法真正绘制。
ThreadedRenderer.java:
private void updateRootDisplayList(View view, HardwareDrawCallbacks callbacks) {updateViewTreeDisplayList(view);if (mRootNodeNeedsUpdate || !mRootNode.isValid()) {DisplayListCanvas canvas = mRootNode.start(mSurfaceWidth, mSurfaceHeight);try {final int saveCount = canvas.save();canvas.translate(mInsetLeft, mInsetTop);callbacks.onHardwarePreDraw(canvas);canvas.insertReorderBarrier();// view.updateDisplayListIfDirty()这个是重点,真正的将要显示的列表交给canvas去绘制canvas.drawRenderNode(view.updateDisplayListIfDirty());canvas.insertInorderBarrier();callbacks.onHardwarePostDraw(canvas);canvas.restoreToCount(saveCount);mRootNodeNeedsUpdate = false;} finally {mRootNode.end(canvas);}}Trace.traceEnd(Trace.TRACE_TAG_VIEW);
}
- 关于View.updateDisplayListIfDirty()方法,我的理解是canvas是整个画布,通过draw,dispatchDraw将要画的内容添加到画布上,通过renderNode.end(canvas)获得当前的画布的内容,最终交给GPU统一去处理。
View.java:
public RenderNode updateDisplayListIfDirty() {......try {if (layerType == LAYER_TYPE_SOFTWARE) {// 软件绘制buildDrawingCache(true);Bitmap cache = getDrawingCache(true);if (cache != null) {canvas.drawBitmap(cache, 0, 0, mLayerPaint);}} else {computeScroll();canvas.translate(-mScrollX, -mScrollY);mPrivateFlags |= PFLAG_DRAWN | PFLAG_DRAWING_CACHE_VALID;mPrivateFlags &= ~PFLAG_DIRTY_MASK;// 如果没有背景,则直接调用dispatchDraw(canvas),否则调用draw(canvas)// Fast path for layouts with no backgroundsif ((mPrivateFlags & PFLAG_SKIP_DRAW) == PFLAG_SKIP_DRAW) {dispatchDraw(canvas);if (mOverlay != null && !mOverlay.isEmpty()) {mOverlay.getOverlayView().draw(canvas);}} else {draw(canvas);}}} finally {// 绘制节点保存,我的理解是canvas是整个画布,通过draw,dispatchDraw将要画的东西添加到画布上,// 通过renderNode.end(canvas)保存画布状态,最终交给GPU去处理renderNode.end(canvas);// 设置alpha等属性setDisplayListProperties(renderNode);}} else {mPrivateFlags |= PFLAG_DRAWN | PFLAG_DRAWING_CACHE_VALID;mPrivateFlags &= ~PFLAG_DIRTY_MASK;}return renderNode;
}
软件绘制过程:
drawSoftware直接调用了View的draw方法,通过这个方法直接绘制。
private boolean drawSoftware(Surface surface, AttachInfo attachInfo, int xoff, int yoff,boolean scalingRequired, Rect dirty) {try {......try {......// 真正绘制,在这里与硬件渲染对比可以看出这里面只是canvas去draw各种内容。mView.draw(canvas);drawAccessibilityFocusedDrawableIfNeeded(canvas);} finally {if (!attachInfo.mSetIgnoreDirtyState) {// Only clear the flag if it was not set during the mView.draw() callattachInfo.mIgnoreDirtyState = false;}}} finally {......}return true;
}
7. 写在后面的话
这篇文章断断续续写了将近两周了,想大而全的全面分析所有方法,发现东西太多了根本不能一下子全部分析完。这里面有很多地方都没有写出来,包括了Choreographer(编舞者),View的measure、layout、draw的过程,还有各种细节的实现以及底层native方法的具体实现。
路漫漫其修远兮,同志仍需努力。