外贸商城网站制作公司/网络推广具体内容
前言
第一次接触机器视觉已经是很久之前的事情了,但当时学的东西也只是皮毛。这篇文章是和高年级组队参加星火杯时写的代码。其实从真正意义上来说,这次本应该没有资格来发这篇推送的(因为我们自己准备时间晚导致比赛时电控的代码还没写完),但还是想和大家分享一下自己的所学所得(希望各位大佬多多指教):
概述
本次所要实现的功能是多颜色识别。用到的机器视觉物块是
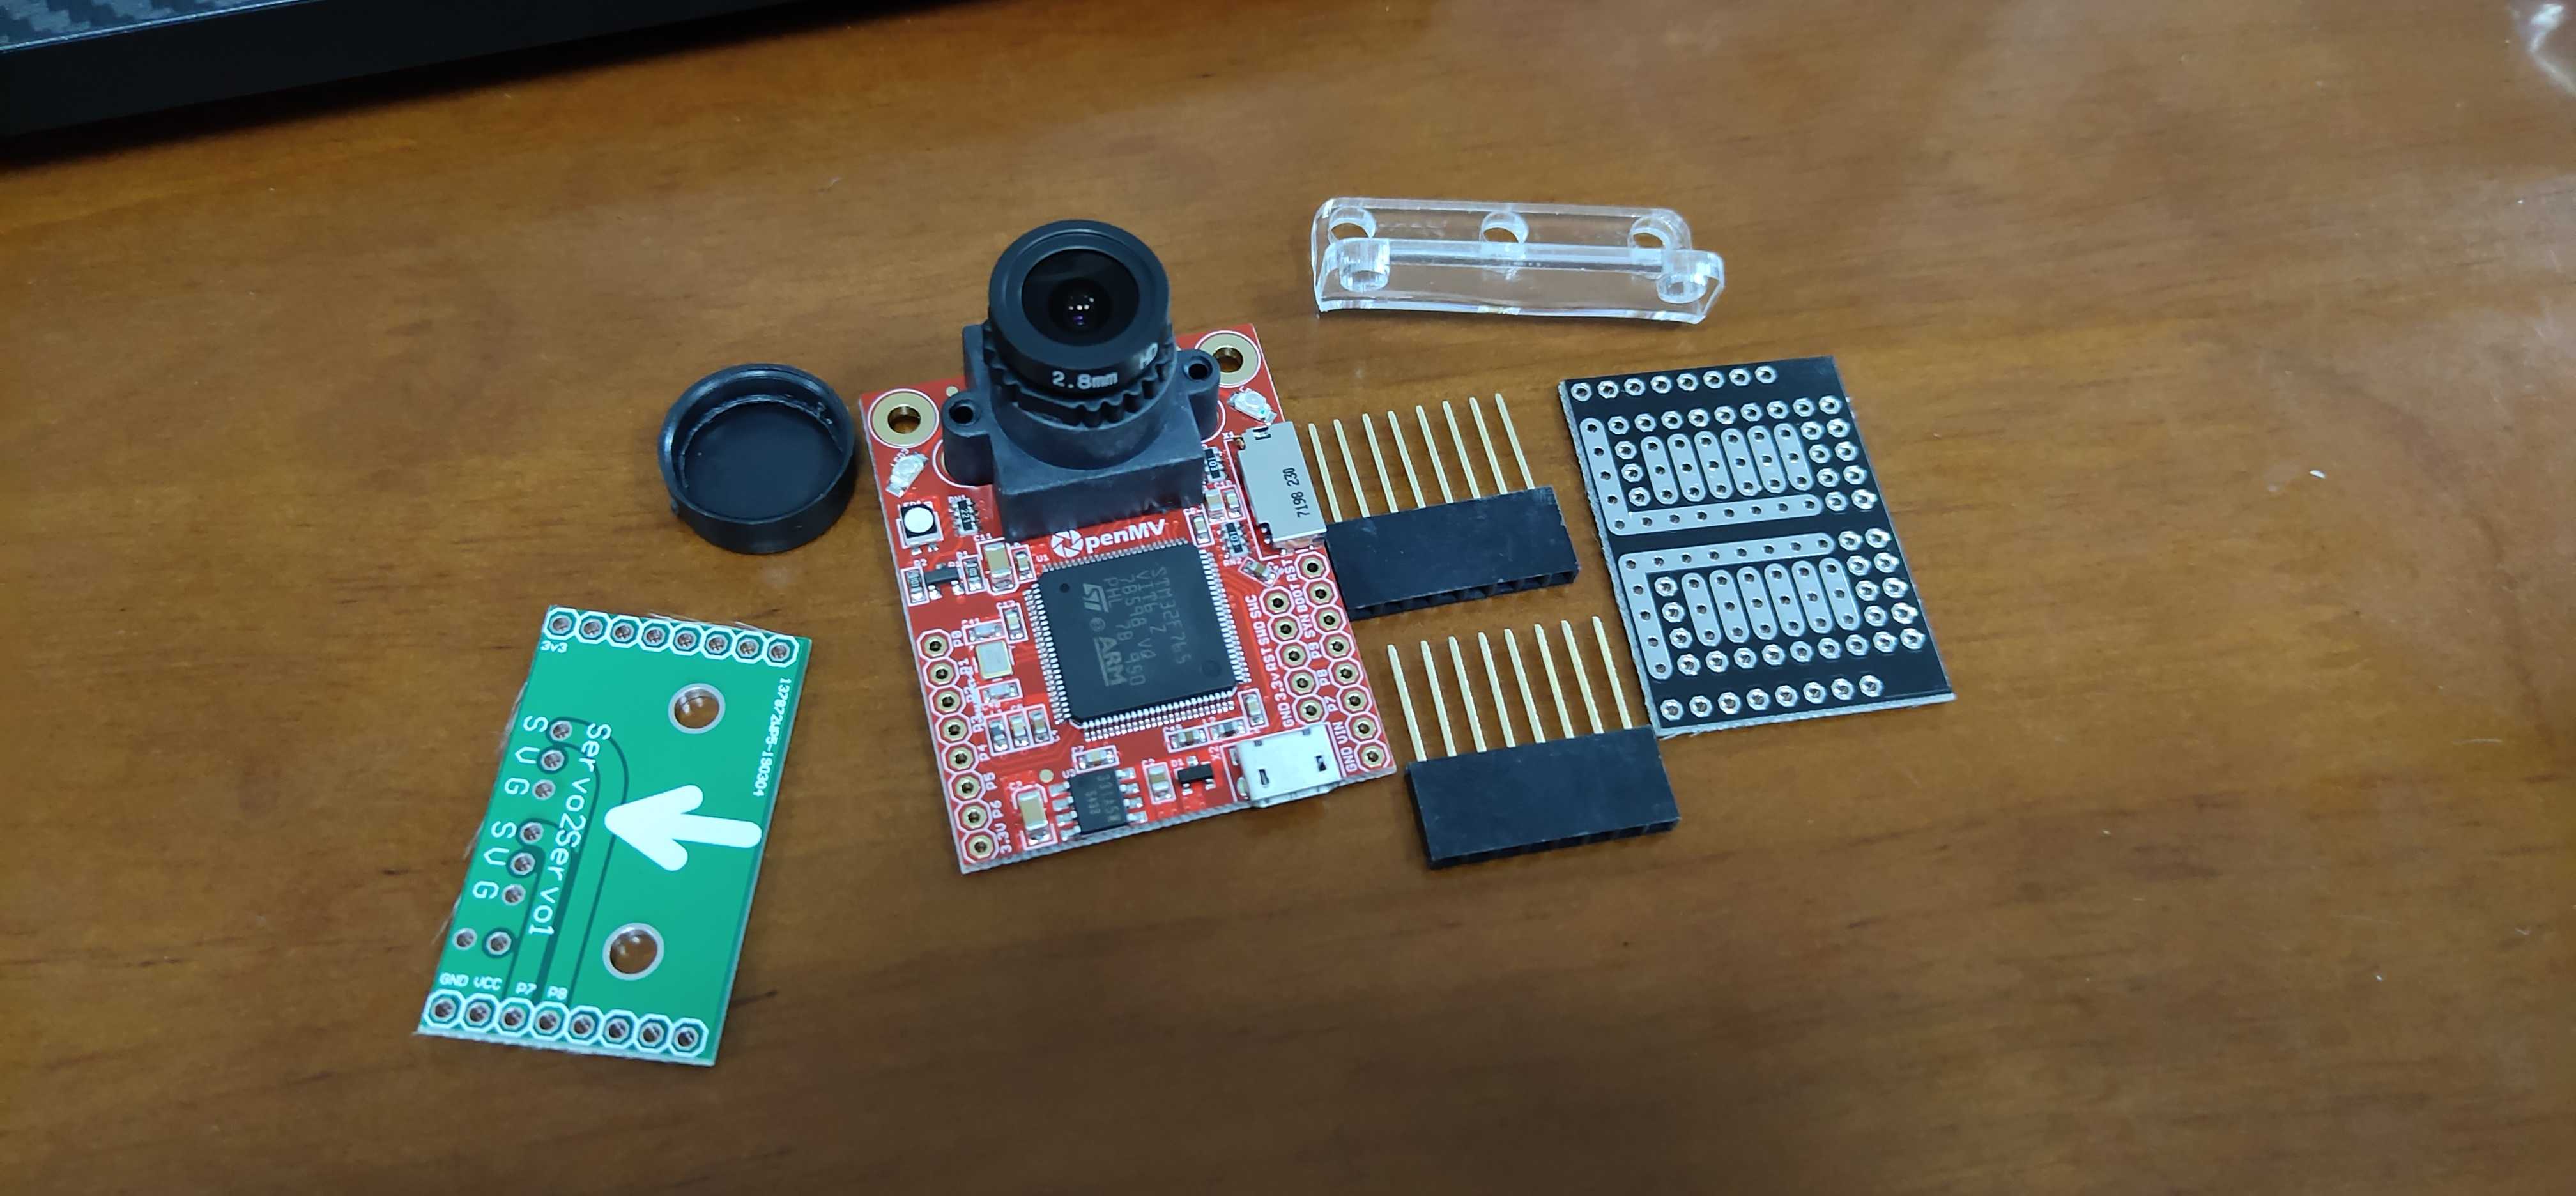
openMV它是入门级机器视觉模块,特点是简单易用,可移植性强。本次所用的语言是python(python是世界上最好的语言)。
下面我们来看一下竞赛要求:
要求
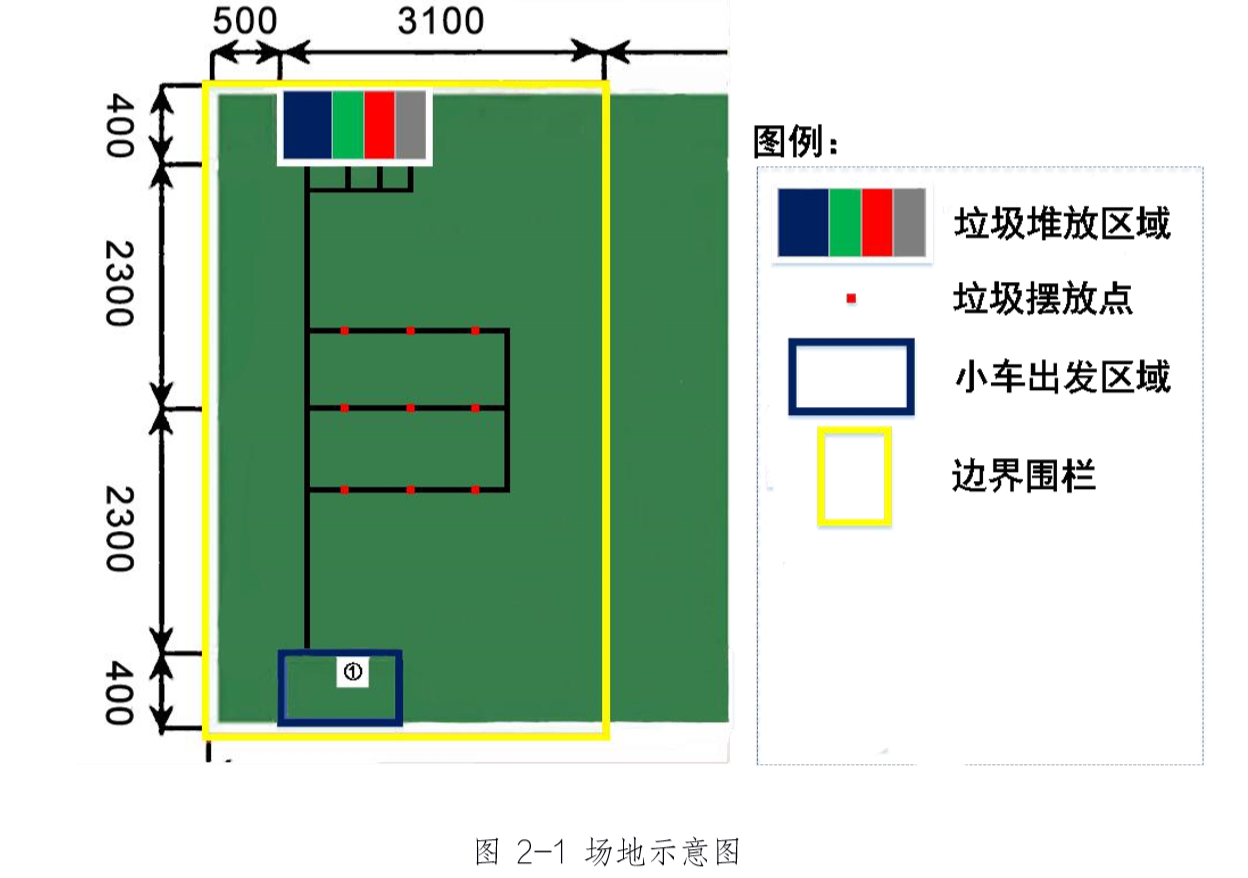
本次比赛需要做出一辆智能车,从出发区去夹取色块放到对应颜色的区域,在规定时间内用时最短且准确率高的获胜。这个赛题是今年全国大学生电子设计大赛的垃圾分类智能车的改编版。其主要的难度就是颜色识别和循迹返回。红色点是不同色块的摆放位置!(由于车被拆了所以没有照片)
这个要求只要做好循迹的稳定性和识别的准确性基本上就成功了,所以下面放出我写的代码吧。
代码与说明
说明
本次代码分为三个板块:颜色识别/通讯/LED灯的使用。其中通讯采用的是UART协议(STM32采用suart协议)实现与stm32的通讯。LED是因为智能车与物块隔得太近的时候光线很弱导致物块颜色色域变化大而误差很大,所以得点亮LED来减小误差值。
1.颜色识别部分
1).导入感光元件的模块与类
import sensor, image, time, math, pyb #(sensor:感光元件/pyb:openMV的各种外设的类)
2).设置红/蓝/绿/灰四种颜色的阈值(RGB三颜色对应的LAB三通道)
red_threshold  = [(0, 60, 61, 127, -128, 127)]   #红色阈值
blue_threshold = [(5, 42, 88, -7, -108, -49)]    #蓝色阈值
green_threshold = [(35, 0, -128, -10, 127, -80)] #绿色阈值
gray_threshold = [(30, 62, 48, -81, -20, -96)]   #灰色阈值
Nothing_threshold = [(24, 75, 43, -18, -9, -76)] #干扰色阈值
3).初始化openMV
sensor.reset() #启动openMV
sensor.set_pixformat(sensor.RGB565)#格式化视野窗口设置颜色色域
sensor.set_framesize(sensor.QVGA)#分辨率设置为320*640
sensor.skip_frames(time = 2000)#跳过n张图像待摄像头稳定
sensor.set_auto_gain(False)#关闭自动增益
sensor.set_auto_whitebal(False)#关闭白平衡
clock = time.clock()#设置时钟脉冲
4).开始捕捉图像
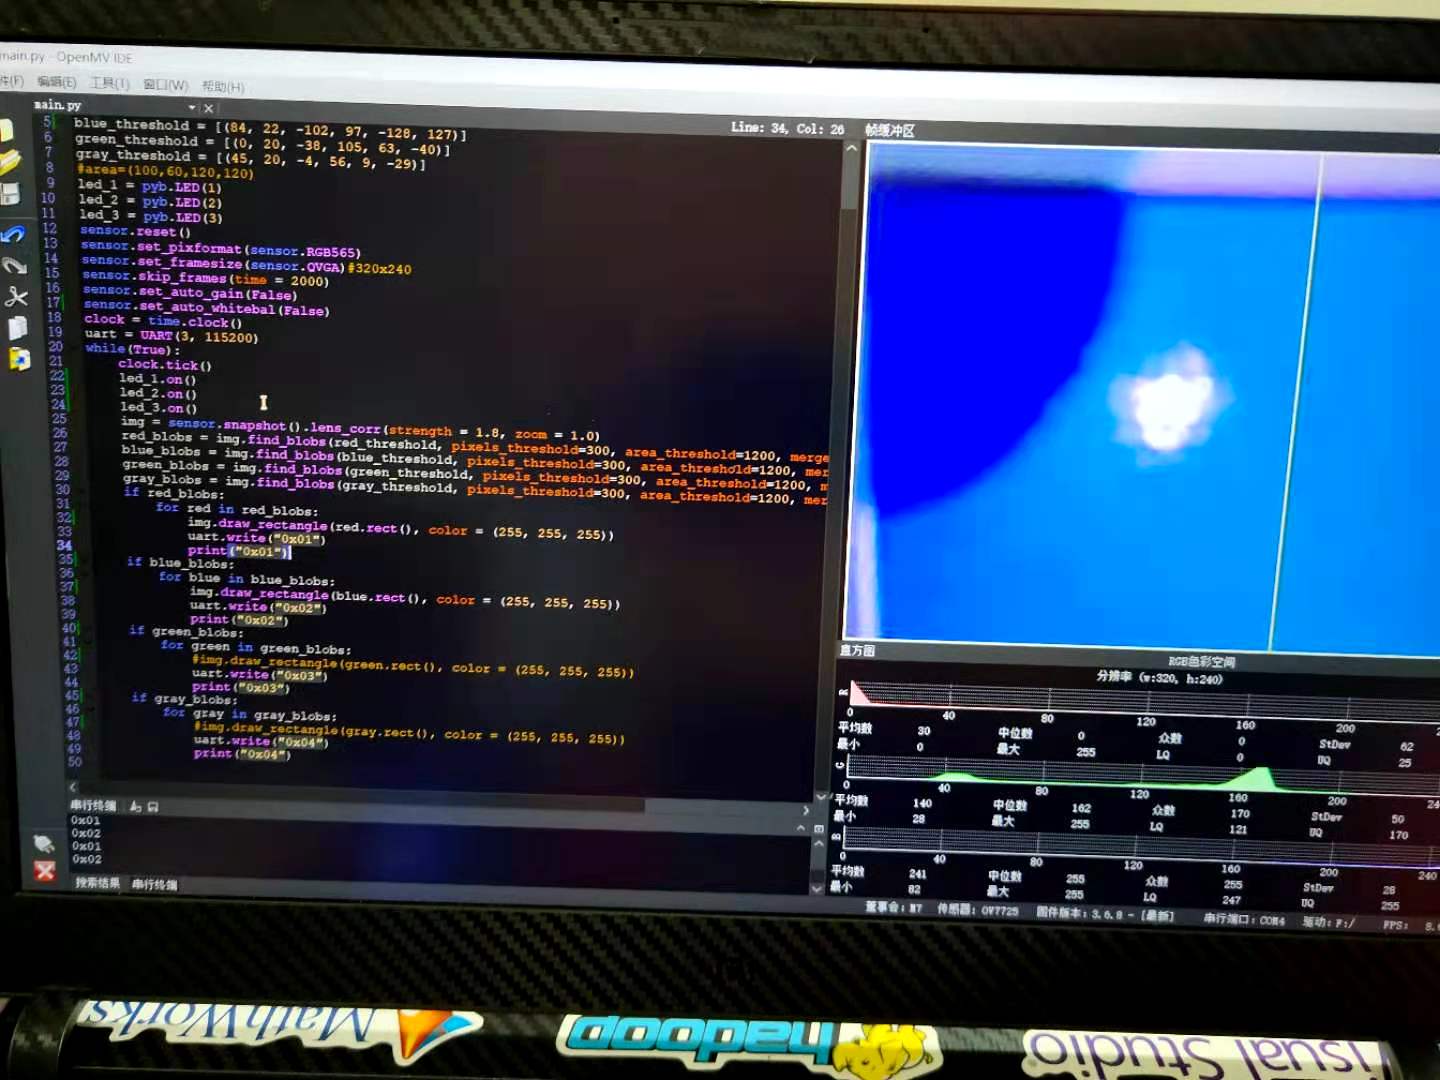
while(True):clock.tick()#开始捕捉图像img = sensor.snapshot().lens_corr(strength = 1.8, zoom = 1.0)#图像赋值且进行鱼眼矫正red_blobs = img.find_blobs(red_threshold, pixels_threshold=500, area_threshold=800)#红色赋值blue_blobs = img.find_blobs(blue_threshold, pixels_threshold=500, area_threshold=800)#蓝色赋值green_blobs = img.find_blobs(green_threshold, pixels_threshold=500, area_threshold=800)#绿色赋值gray_blobs = img.find_blobs(gray_threshold, pixels_threshold=500, area_threshold=800)#灰色赋值none_blobs = img.find_blobs(Nothing_threshold, pixels_threshold=500, area_threshold=800)#干扰色赋值if red_blobs: '''如果是红色色块则用白色矩形框框起来'''for red in red_blobs:img.draw_rectangle(red.rect(), color = (255, 255, 255))#画白色矩形线框uart.white("0x01")#通过串口向stm32发送对应数值elif blue_blobs: '''如果是蓝色色块则用白色矩形框框起来'''for blue in blue_blobs:img.draw_rectangle(blue.rect(), color = (255, 255, 255))#画白色矩形线框uart.white("0x02")#通过串口向stm32发送对应数值elif green_blobs: '''如果是绿色色块则用白色矩形框框起来'''for green in green_blobs:img.draw_rectangle(green.rect(), color = (255, 255, 255))#画白色矩形线框uart.white("0x03")#通过串口向stm32发送对应数值elif gray_blobs: '''如果是灰色色块则用白色矩形框框起来'''for gray in gray_blobs:img.draw_rectangle(gray.rect(), color = (255, 255, 255))#画白色矩形线框uart.white("0x04")#通过串口向stm32发送对应数值elif none_blobs: '''如果是干扰色色块则用白色矩形框框起来'''for no_blob in none_blobs:img.draw_rectangle(no_blob.rect(), color = (255, 255, 255))print("nothing")#不向stm32发送对应数值
2.UART串口通讯
1).导入相应的类和模块(此处数据传输用的是json数据包格式)
from pyb import UART #从外设类中导入uart模块
import json #导入json类
2).初始化uart串口
uart = UART(3,115200)   #定义串口3变量和115200波特率
uart.init(115200, bits=8, parity=None, stop=1) #初始化串口待其稳定
3).发送json数据
格式为:
uart.write #写入
uart.read #输出
#其他用法自行看其开发文档对函数的定义与说明
3.使用LED照明
LED对应三个引脚,分别是红绿蓝,三个引脚同时输出高电平则显示白色光
1).导入LED/pin模块
from pyb import LED, Pin, Timer
2).引脚赋值
pin1 = Pin('P0', Pin.OUT_PP)
pin2 = Pin('P1', Pin.OUT_PP)
led_1 = pyb.LED(1)
led_2 = pyb.LED(2)
led_3 = pyb.LED(3)
3).同时点亮三种颜色的LED灯
led_1.on()
led_2.on()
led_3.on()
最终效果
全部代码
#此代码进行过多次改版,以上文描述的为准
import sensor, image, time, math, pyb
from pyb import LED, Pin, Timer,URART
import json
pin1 = Pin('P0', Pin.OUT_PP)
pin2 = Pin('P1', Pin.OUT_PP)
led_1 = pyb.LED(1)
led_2 = pyb.LED(2)
led_3 = pyb.LED(3)
red_threshold  = [(0, 60, 61, 127, -128, 127)]
blue_threshold = [(5, 42, 88, -7, -108, -49)]
green_threshold = [(35, 0, -128, -10, 127, -80)]
gray_threshold = [(30, 62, 48, -81, -20, -96)]
Nothing_threshold = [(24, 75, 43, -18, -9, -76)]
sensor.reset()
sensor.set_pixformat(sensor.RGB565)
sensor.set_framesize(sensor.QVGA)
sensor.skip_frames(time = 2000)
sensor.set_auto_gain(False)
sensor.set_auto_whitebal(False)
clock = time.clock()
while(True):clock.tick()led_1.on()led_2.on()led_3.on()img = sensor.snapshot().lens_corr(strength = 1.8, zoom = 1.0)red_blobs = img.find_blobs(red_threshold, pixels_threshold=500, area_threshold=800)blue_blobs = img.find_blobs(blue_threshold, pixels_threshold=500, area_threshold=800)green_blobs = img.find_blobs(green_threshold, pixels_threshold=500, area_threshold=800)gray_blobs = img.find_blobs(gray_threshold, pixels_threshold=500, area_threshold=800)none_blobs = img.find_blobs(Nothing_threshold, pixels_threshold=500, area_threshold=800)if red_blobs:for red in red_blobs:img.draw_rectangle(red.rect(), color = (255, 255, 255))pin1.high()print("0x01")elif blue_blobs:for blue in blue_blobs:img.draw_rectangle(blue.rect(), color = (255, 255, 255))pin1.low()print("0x02")elif green_blobs:for green in green_blobs:img.draw_rectangle(green.rect(), color = (255, 255, 255))pin2.high()print("0x03")elif gray_blobs:for gray in gray_blobs:img.draw_rectangle(gray.rect(), color = (255, 255, 255))pin2.low()print("0x04")elif none_blobs:for no_blob in none_blobs:img.draw_rectangle(no_blob.rect(), color = (255, 255, 255))#print("nothing")