最近在看SpringCloud,为了帮助自己学习和记忆,所以写下这篇文章。
从SpringCloud官方文档上看SpringCloudConfig其实为我们提供配置外部化的一个服务,可以理解成就是个web服务,我们通过请求到web服务上获取我们所需要的配置文件。
我们首先在github上创建一个项目,然后创建几个配置文件
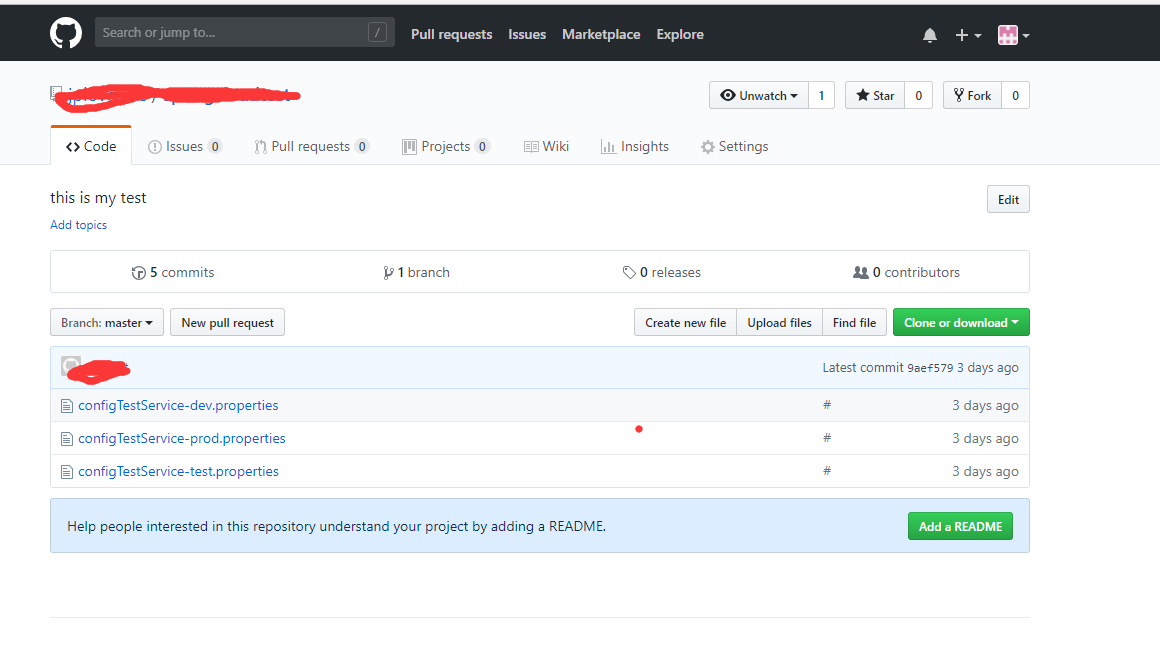
我创建了3个配置文件,分别对应开发,测试和生产三个环境,
我们配置文件建好之后,开始创建SpringCloudConfig服务
我先放一下我的项目结构,不然pom.xml有些小伙伴可能不理解
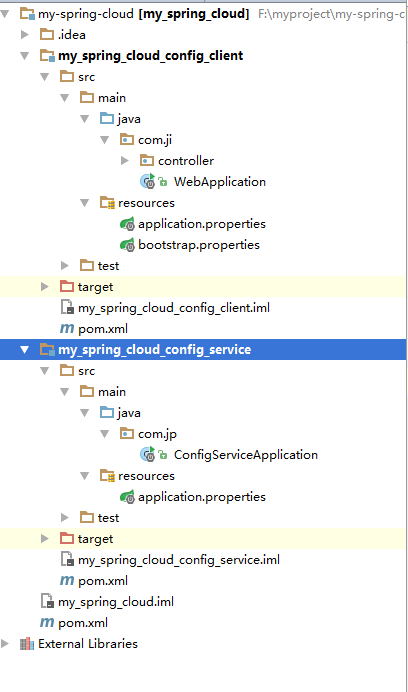
my-spring-cloud就是最外层项目的pom.xml
<?xml version="1.0" encoding="UTF-8"?>
<project xmlns="http://maven.apache.org/POM/4.0.0"xmlns:xsi="http://www.w3.org/2001/XMLSchema-instance"xsi:schemaLocation="http://maven.apache.org/POM/4.0.0 http://maven.apache.org/xsd/maven-4.0.0.xsd"><modelVersion>4.0.0</modelVersion><groupId>jipeng.com</groupId><artifactId>my_spring_cloud</artifactId><packaging>pom</packaging><version>1.0-SNAPSHOT</version><modules><module>my_spring_cloud_config_service</module><module>my_spring_cloud_config_client</module></modules><parent><groupId>org.springframework.boot</groupId><artifactId>spring-boot-starter-parent</artifactId><version>1.5.13.RELEASE</version></parent><build><plugins><plugin><groupId>org.springframework.boot</groupId><artifactId>spring-boot-maven-plugin</artifactId></plugin></plugins></build><properties><project.build.sourceEncoding>UTF-8</project.build.sourceEncoding><project.reporting.outputEncoding>UTF-8</project.reporting.outputEncoding><java.version>1.8</java.version><spring-cloud.version>Edgware.SR3</spring-cloud.version></properties><dependencyManagement><dependencies><dependency><groupId>org.springframework.cloud</groupId><artifactId>spring-cloud-dependencies</artifactId><version>${spring-cloud.version}</version><type>pom</type><scope>import</scope></dependency></dependencies></dependencyManagement><repositories><repository><id>spring-snapshots</id><url>http://repo.spring.io/snapshot</url><snapshots><enabled>true</enabled></snapshots></repository><repository><id>spring-milestones</id><url>http://repo.spring.io/milestone</url></repository></repositories><pluginRepositories><pluginRepository><id>spring-snapshots</id><url>http://repo.spring.io/snapshot</url></pluginRepository><pluginRepository><id>spring-milestones</id><url>http://repo.spring.io/milestone</url></pluginRepository></pluginRepositories><name>my_spring_cloud</name>
</project>
这里我们比正常的springboot项目多了一个 spring-cloud-dependencies
这是SpringCloud主包,后面我们SpringCloudConfig的包需要依赖这个,所以版本问题大家需要注意。

下面看下我们my_spring_cloud_config_service项目的pom.xml
<?xml version="1.0" encoding="UTF-8"?>
<project xmlns="http://maven.apache.org/POM/4.0.0"xmlns:xsi="http://www.w3.org/2001/XMLSchema-instance"xsi:schemaLocation="http://maven.apache.org/POM/4.0.0 http://maven.apache.org/xsd/maven-4.0.0.xsd"><parent><artifactId>my_spring_cloud</artifactId><groupId>jipeng.com</groupId><version>1.0-SNAPSHOT</version></parent><modelVersion>4.0.0</modelVersion><artifactId>my_spring_cloud_config_service</artifactId><dependencies><dependency><groupId>org.springframework.boot</groupId><artifactId>spring-boot-starter-web</artifactId></dependency><dependency><groupId>org.springframework.cloud</groupId><artifactId>spring-cloud-config-server</artifactId></dependency></dependencies></project>
很简单比我们正常的web项目多了一个 spring-cloud-config-server
下面再看下我们 spring-cloud-config-server 的application.properties 文件
#服务端口
server.port=8091
#服务名称
spring.application.name=configService#服务对应的git地址,就是你git项目地址,你clone的那个地址
spring.cloud.config.server.git.uri=https://github.com/xxx/xxx.git
#git仓库地址下的相对地址,可以配置多个,用,分割。
spring.cloud.config.server.git.search-paths=/**
#配置文件所在的分支
spring.cloud.config.label=master
#git仓库用户名
spring.cloud.config.username=xxx
#git仓库密码
spring.cloud.config.password=xxx
我们创建一个 ConfigServiceApplication 代码如下
import org.springframework.boot.SpringApplication;
import org.springframework.boot.autoconfigure.SpringBootApplication;
import org.springframework.cloud.config.server.EnableConfigServer;/*** @Author: jipeng* @Description:* @Date: Created in 2018/6/7 7:54*/
@EnableConfigServer
@SpringBootApplication
public class ConfigServiceApplication {public static void main(String[] args){SpringApplication.run(ConfigServiceApplication.class,args);}
}
比正常的web项目多了一个 EnableConfigServer 注解,这是一个SpringCloud注解,有了这个注解及时告诉项目这是一个配置服务。好了,到此我们的配置服务已经好了,我们可以启动项目通过postman来检验下我们的成果
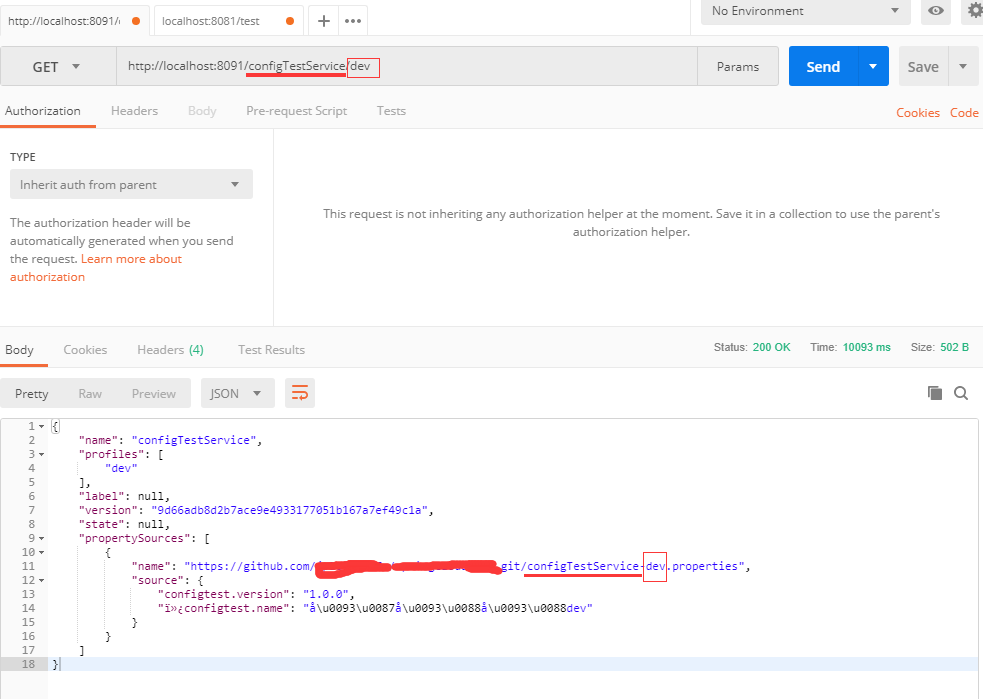
看下我们的请求地址 http://localhost:8091/configTestService/dev
再看下github中的配置文件

大家是不是发现了什么
/configTestService/dev 就是根据我们github中的配置文件名来的 configTestService 为我们的应用名称 dev 为 环境
现在config服务端搭好了,我们搭建客户端
客户端的pom
<?xml version="1.0" encoding="UTF-8"?>
<project xmlns="http://maven.apache.org/POM/4.0.0"xmlns:xsi="http://www.w3.org/2001/XMLSchema-instance"xsi:schemaLocation="http://maven.apache.org/POM/4.0.0 http://maven.apache.org/xsd/maven-4.0.0.xsd"><parent><artifactId>my_spring_cloud</artifactId><groupId>jipeng.com</groupId><version>1.0-SNAPSHOT</version></parent><modelVersion>4.0.0</modelVersion><artifactId>my_spring_cloud_config_client</artifactId><dependencies><dependency><groupId>org.springframework.boot</groupId><artifactId>spring-boot-starter-web</artifactId></dependency><dependency><groupId>org.springframework.cloud</groupId><artifactId>spring-cloud-starter-config</artifactId></dependency></dependencies><build><finalName>my_spring_cloud_config_client</finalName></build>
</project>
比正常的web多了一个 spring-cloud-starter-config
客户端的application.properties 就两个配置
server.port:8081
spring.applicaton.name=configclient
客户端多了一个bootstrap的配置文件,里面配置的是SpringCloudConfig的相关配置
#配置应用名称
spring.cloud.config.name=configTestService
#配置文件的版本
spring.cloud.config.profile=test
#配置服务的地址
spring.cloud.config.uri=http://localhost:8091/
#配置文件所在的分支
spring.cloud.config.label=master
创建一个 WebApplication ,代码如下
import org.springframework.boot.SpringApplication;
import org.springframework.boot.autoconfigure.SpringBootApplication;/*** @Author: jipeng* @Description:* @Date: Created in 2018/6/8 7:03*/
@SpringBootApplication
public class WebApplication {public static void main(String[] args){SpringApplication.run(WebApplication.class,args);}
}
我们创建一个 TestController
import org.springframework.beans.factory.annotation.Value;
import org.springframework.web.bind.annotation.RequestMapping;
import org.springframework.web.bind.annotation.RestController;/*** @Author: jipeng* @Description:* @Date: Created in 2018/6/8 7:52*/
@RestController
public class TestController {@Value("${configtest.version}")private String version;@RequestMapping("/test")public String from() {return this.version;}
}
都加好了我们启动项目,留意下启动日记,就是启动日记刚开始打印的时候
2018-06-10 21:45:07.420  INFO 8376 --- [           main] c.c.c.ConfigServicePropertySourceLocator : Fetching config from server at: http://localhost:8091/
2018-06-10 21:45:11.347  INFO 8376 --- [           main] c.c.c.ConfigServicePropertySourceLocator : Located environment: name=configTestService, profiles=[dev], label=master, version=9d66adb8d2b7ace9e4933177051b167a7ef49c1a, state=null
2018-06-10 21:45:11.348  INFO 8376 --- [           main] b.c.PropertySourceBootstrapConfiguration : Located property source: CompositePropertySource [name='configService', propertySources=[MapPropertySource {name='configClient'}, MapPropertySource {name='https://github.com/jploveslife/springcloudtest.git/configTestService-dev.properties'}]]
2018-06-10 21:45:11.352  INFO 8376 --- [           main] com.ji.WebApplication                    : No active profile set, falling back to default profiles: default
2018-06-10 21:45:11.369  INFO 8376 --- [           main] ationConfigEmbeddedWebApplicationContext : Refreshing org.springframework.boot.context.embedded.AnnotationConfigEmbeddedWebApplicationContext@3a5ecce3: startup date [Sun Jun 10 21:45:11 CST 2018]; parent: org.springframework.context.annotation.AnnotationConfigApplicationContext@10db82ae
2018-06-10 21:45:11.855  INFO 8376 --- [           main] o.s.cloud.context.scope.GenericScope     : BeanFactory id=0537ae00-a03a-35d0-830a-1277fd4d74d0
2018-06-10 21:45:11.913  INFO 8376 --- [           main] trationDelegate$BeanPostProcessorChecker : Bean 'org.springframework.cloud.autoconfigure.ConfigurationPropertiesRebinderAutoConfiguration' of type [org.springframework.cloud.autoconfigure.ConfigurationPropertiesRebinderAutoConfiguration$$EnhancerBySpringCGLIB$$4fec7b02] is not eligible for getting processed by all BeanPostProcessors (for example: not eligible for auto-proxying)
我会发现刚启动的时候是使用我们的配置服务去获取的配置文件,这里面的原理下次讲
我们来通过postman验证下,看配置有没有过来,我们请求test接口
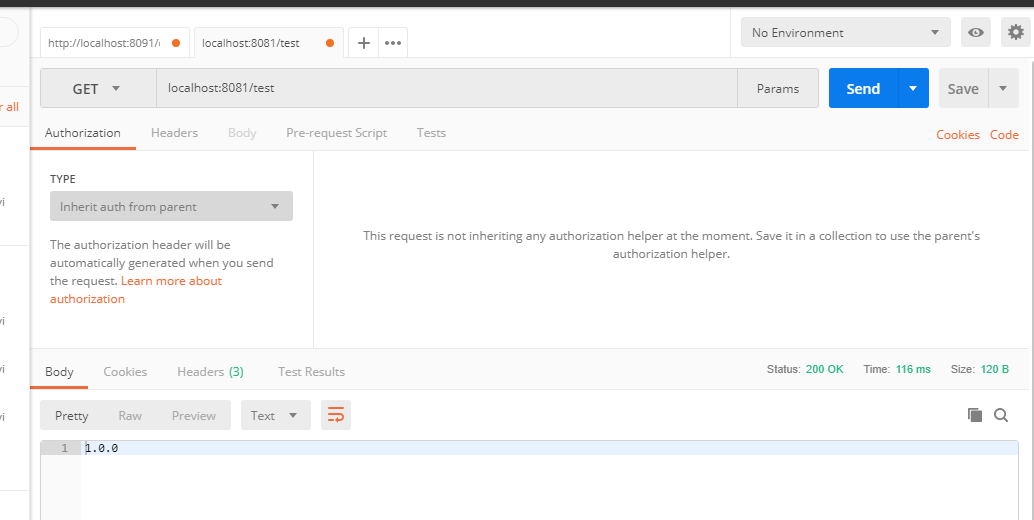
返回1.0.0 和我们配置文件中一直,说明配置生效了。
到此就结束了,没讲多少,都是直接上的代码,希望这个文章对大家了解SpringCloudConfig有所帮助。实际生产中比这个复杂,大家可以通过不同的场景搭建不同的配置服务。