新闻网站建设意义/武汉新一轮疫情

目录
一 、抽象类
1、抽象类概念
2、抽象类语法
3、抽象类特性
4、抽象类的作用
二、接口
1、接口的概念
2、语法规则
3、接口使用
4、接口特性
5、实现多个接口
6、接口间的继承
7、抽象类和接口的区别
8、接口使用实例
9、Clonable 接口和深拷贝
三、Object类
1、什么是Object类
2、获取对象信息
3、对象比较equals方法
4、hashcode方法
OVER!
一 、抽象类
1、抽象类概念

2、抽象类语法
// 抽象类:被abstract修饰的类
public abstract class Shape {// 抽象方法:被abstract修饰的方法,没有方法体abstract public void draw();abstract void calcArea();// 抽象类也是类,也可以增加普通方法和属性public double getArea(){return area;}protected double area; // 面积
}3、抽象类特性
Shape shape = new Shape();
// 编译出错Error:(30, 23) java: Shape是抽象的; 无法实例化
2. 抽象方法不能是 private 的
abstract class Shape {abstract private void draw();
}
// 编译出错
Error:(4, 27) java: 非法的修饰符组合: abstract和privatepublic abstract class Shape {abstract final void methodA();abstract public static void methodB();
}
// 编译报错:
// Error:(20, 25) java: 非法的修饰符组合: abstract和final
// Error:(21, 33) java: 非法的修饰符组合: abstract和staticimport sun.security.mscapi.CPublicKey;public class Test{public static void main(String[] args) {drawmap(new Rectangle());drawmap(new Circle());drawmap(new Flower());}public static void drawmap(Shape shape){shape.draw();}
}abstract class Shape{public abstract void draw();
}class Rectangle extends Shape{@Overridepublic void draw() {System.out.println("矩形");}
}class Circle extends Shape{@Overridepublic void draw() {System.out.println("⭕");}
}class Flower extends Shape{@Overridepublic void draw() {System.out.println("❀");}
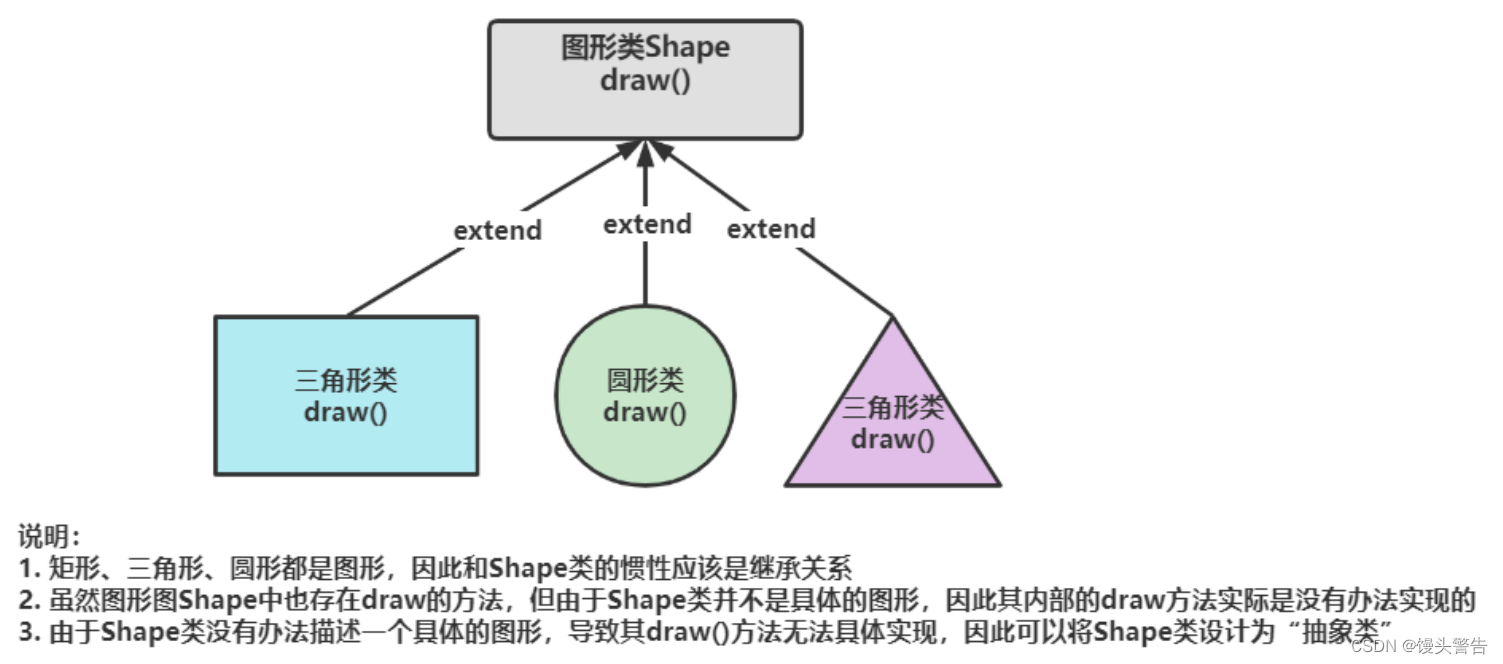
}4、抽象类的作用
抽象类本身不能被实例化, 要想使用, 只能创建该抽象类的子类. 然后让子类重写抽象类中的抽象方法
那么这个时候,我们就会有疑问了:
二、接口
1、接口的概念

2、语法规则
public interface 接口名称{// 抽象方法public abstract void method1(); // public abstract 是固定搭配,可以不写public void method2();abstract void method3();void method4();
// 注意:在接口中上述写法都是抽象方法,更推荐方式4,代码更简洁
}
那么在这里,我们要注意几点:
1. 创建接口时, 接口的命名一般以大写字母 I 开头.2. 接口的命名一般使用 "形容词" 词性的单词.3. 阿里编码规范中约定, 接口中的方法和属性不要加任何修饰符号, 保持代码的简洁性.
3、接口使用
public class 类名称 implements 接口名称{
// ...
}那么现在,我们来实现一个笔记本电脑中的接口,要求如下:
请实现笔记本电脑使用USB鼠标、USB键盘的例子1. USB接口:包含打开设备、关闭设备功能2. 笔记本类:包含开机功能、关机功能、使用USB设备功能3. 鼠标类:实现USB接口,并具备点击功能4. 键盘类:实现USB接口,并具备输入功能
interface USB{void openDevice();void closeDevice();
}class Computer implements USB{@Overridepublic void closeDevice() {System.out.println("打开电脑");}public void useDevice(USB usb){usb.openDevice();if(usb instanceof Mouse){Mouse mouse = (Mouse)usb;mouse.click();}else if(usb instanceof KeyBoard){KeyBoard keyBoard = (KeyBoard)usb;keyBoard.inPut();}usb.closeDevice();}@Overridepublic void openDevice() {System.out.println("关闭电脑");}
}
class Mouse implements USB{@Overridepublic void openDevice() {System.out.println("打开鼠标");}@Overridepublic void closeDevice() {System.out.println("关闭鼠标");}public void click(){System.out.println("鼠标点击");}
}
class KeyBoard implements USB {@Overridepublic void openDevice() {System.out.println("打开键盘");}@Overridepublic void closeDevice() {System.out.println("关闭键盘");}public void inPut(){System.out.println("键盘输入");}
}
public class Test {public static void main(String[] args) {Computer computer = new Computer();computer.openDevice();
// 使用鼠标设备computer.useDevice(new Mouse());
// 使用键盘设备computer.useDevice(new KeyBoard());computer.closeDevice();}
}4、接口特性
public class TestUSB {public static void main(String[] args) {USB usb = new USB();}
}
// Error:(10, 19) java: day20210915.USB是抽象的; 无法实例化public interface USB {// Error:(4, 18) java: 此处不允许使用修饰符privateprivate void openDevice();void closeDevice();
} void openDevice();// 编译失败:因为接口中的方式默认为抽象方法
// Error:(5, 23) java: 接口抽象方法不能带有主体void closeDevice(){System.out.println("关闭USB设备");}
}public interface USB {void openDevice(); // 默认是public的void closeDevice(); // 默认是public的
}
public class Mouse implements USB {@Overridevoid openDevice() {System.out.println("打开鼠标");}
// ...}// 编译报错,重写USB中openDevice方法时,不能使用默认修饰符
// 正在尝试分配更低的访问权限; 以前为public
public interface USB {double brand = 3.0; // 默认被:final public static修饰void openDevice();void closeDevice();
}
public class TestUSB {public static void main(String[] args) {System.out.println(USB.brand); // 可以直接通过接口名访问,说明是静态的
// 编译报错:Error:(12, 12) java: 无法为最终变量brand分配值USB.brand = 2.0; // 说明brand具有final属性}
}public interface USB {// 编译失败public USB(){}{} // 编译失败void openDevice();void closeDevice();
}5、实现多个接口
class Animal {protected String name;public Animal(String name) {this.name = name;}
}interface IFlying {void fly();
}
interface IRunning {void run();
}
interface ISwimming {void swim();
}class Cat extends Animal implements IRunning {public Cat(String name) {super(name);}@Overridepublic void run() {System.out.println(this.name + "正在用四条腿跑");}
}class Fish extends Animal implements ISwimming {public Fish(String name) {super(name);}@Overridepublic void swim() {System.out.println(this.name + "正在用尾巴游泳");}
}此时,只实现了一个接口,接下来我们创建一个实现多个接口的类:
class Frog extends Animal implements IRunning, ISwimming {public Frog(String name) {super(name);}@Overridepublic void run() {System.out.println(this.name + "正在往前跳");}@Overridepublic void swim() {System.out.println(this.name + "正在蹬腿游泳");}
}1、类和类之间:可以通过extends来继承2、类与接口之间:通过implements来实现接口3、接口与接口之间也可以通过extends来进行关联,这个时候我们可以将其理解为扩展接口的意思。
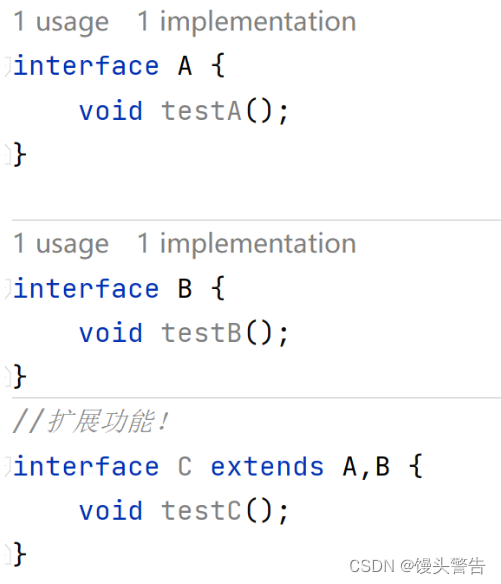
对于此时的C接口,它不仅具有自己的功能,同时也拥有了A、B这两个接口的功能。
6、接口间的继承
interface IRunning {void run();
}
interface ISwimming {void swim();
}
// 两栖的动物, 既能跑, 也能游
interface IAmphibious extends IRunning, ISwimming {
}
class Frog implements IAmphibious {
...
}接口间的继承相当于把多个接口合并在一起.
7、抽象类和接口的区别
class Animal {protected String name;public Animal(String name) {this.name = name;}
}抽象类存在的意义是为了让编译器更好的校验, 像 Animal 这样的类我们并不会直接使用, 而是使用它的子类. 万一不小心创建了 Animal 的实例, 编译器会及时提醒我们.
| NO | 区别 | 抽象类(abstract) | 接口(interface) |
|---|---|---|---|
| 1 | 结构构成 | 普通变量 + 抽象方法 | 抽象方法 + 全局变量 |
| 2 | 权限 | 各种权限 | public |
| 3 | 子类使用 | 使用extends关键字继承抽象类 | 使用 implements 关键字实现接口 |
| 4 | 关系 | 一个抽象类可以实现若干接口 | 接口不能继承抽象类,但是接口可以使用extends关键字继承多个父类接口 |
| 5 | 子类限制 | 一个子类只能继承一个抽象类 | 一个子类可以实现多个接口 |
8、接口使用实例
给对象数组排序
在学习给对象数组进行排序之前,我们先来回顾一下怎么对一个整型数组进行排序:
import java.util.Arrays;public class Test {public static void main(String[] args) {int[] arr = {1,4,5,3,2,9,7};Arrays.sort(arr);System.out.println(Arrays.toString(arr));}
}
那么这个时候,便会有人写出这样的一段代码:
import java.util.Arrays;class Student{public String name;public int age;public double score;public Student(String name,int age,double score) {this.name = name;this.age = age;this.score = score;}@Overridepublic String toString() {return "Student{" +"name='" + name + '\'' +", age=" + age +", score=" + score +'}';}
}public class Test {public static void main(String[] args) {Student[] array = new Student[3];array[0] = new Student("zhangsan",19,90);array[1] = new Student("lisi",86,35);System.out.println("排序前: " + Arrays.toString(array));Arrays.sort(array);System.out.println("排序后: "+ Arrays.toString(array));}
}
经过运行,我们会发现这段代码会进行报错,这是因为我们在排序的时候并没有告诉编译器是按照什么来排序,并且Student是一个自定义类型而导致的。
根据报错,我们可以发现是源码中的转化出了问题,现在我们顺着源码点进去看一下
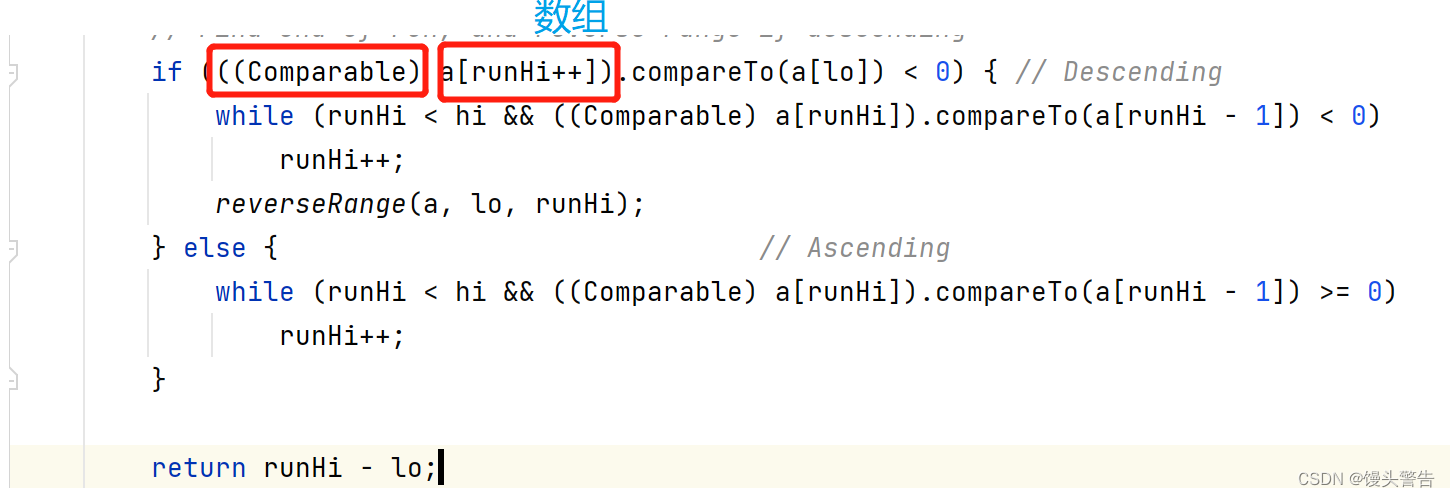
这段源码的意思是将数组强转为Comparable,那么这个 Comparable又是什么东西呢?我们再来看看它的源码
我们可以发现,它是一个接口

也就是说,他要把数组里面的元素强转为Compareable,然后去调用Compare to方法
也就是说,此时我们要让Student类型和Compareable之间进行联系:
我们会发现,此时会发生报错,那么此时我们再对compare to进行重写:
@Overridepublic int compareTo(Student o) {if(this.age - o.age > 0){return 1;}else if (this.age - o.age < 0){return -1;}else {return 0;}}
那么此时我们再运行代码会发现排序成功:

完整的代码是这个样子的:
import java.util.Arrays;
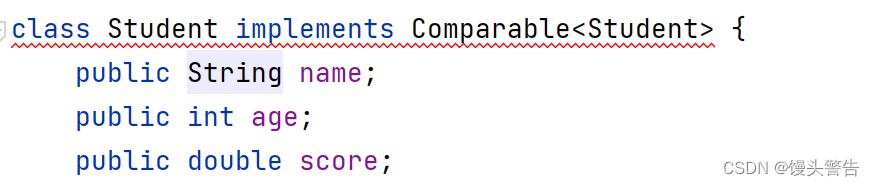
import java.util.Comparator;class Student implements Comparable<Student> {public String name;public int age;public double score;@Overridepublic int compareTo(Student o) {if(this.age - o.age > 0){return 1;}else if (this.age - o.age < 0){return -1;}else {return 0;}}public Student(String name, int age, double score) {this.name = name;this.age = age;this.score = score;}@Overridepublic String toString() {return "Student{" +"name='" + name + '\'' +", age=" + age +", score=" + score +'}';}
}public class Test {public static void main(String[] args) {Student[] array = new Student[3];array[0] = new Student("zhangsan",19,90);array[1] = new Student("lisi",86,35);array[2] = new Student("wangwu",45,18);System.out.println("排序前: " + Arrays.toString(array));Arrays.sort(array);System.out.println("排序后: "+ Arrays.toString(array));}
}如果当前对象应排在参数对象之前, 返回小于 0 的数字;如果当前对象应排在参数对象之后, 返回大于 0 的数字;如果当前对象和参数对象不分先后, 返回 0;
因此我们得出一个结论:当我们对自定义类型进行比较的时候,一定要实现可比较的接口!也就是说:
import java.util.Arrays;
import java.util.Comparator;class Student implements Comparable<Student> {public String name;public int age;public double score;@Overridepublic int compareTo(Student o) {if(this.age - o.age > 0){return 1;}else if (this.age - o.age < 0){return -1;}else {return 0;}}public Student(String name, int age, double score) {this.name = name;this.age = age;this.score = score;}@Overridepublic String toString() {return "Student{" +"name='" + name + '\'' +", age=" + age +", score=" + score +'}';}
}public class Test {public static void main(String[] args) {Student[] array = new Student[3];array[0] = new Student("zhangsan",19,90);array[1] = new Student("lisi",86,35);array[2] = new Student("wangwu",45,18);System.out.println("排序前: " + Arrays.toString(array));bubblesort(array);System.out.println("排序后: "+ Arrays.toString(array));}public static void bubblesort(Comparable[] comparables){for (int i = 0;i < comparables.length-1;i++){for (int j = 0;j < comparables.length-1-i;j++){if(comparables[j].compareTo(comparables[j+1]) > 0){Comparable tmp = comparables[j];comparables[j] = comparables[j+1];comparables[j+1] = tmp;}}}}
}
用这种方法,同样也可以实现对象数组的排序:
在之前实现对象数组排序的时候,我们发现可以用上面的方法对Student的age进行排序,那么如果我们也想同时对score进行排序,又该怎么办呢?
这个时候,就轮到我们的Comparator出场了:
class AgeComparator implements Comparator<Student>{@Overridepublic int compare(Student o1, Student o2) {return o1.age - o2.age;}
}public class Test {public static void main(String[] args) {Student student1 = new Student("zhangsan",19,90);Student student2 = new Student("lisi",86,35);AgeComparator ageComparator = new AgeComparator();int ret = ageComparator.compare(student1,student2);System.out.println(ret);}}
我们可以通过ret 的正负来判断大小,从而进行排序。
9、Clonable 接口和深拷贝
Java 中内置了一些很有用的接口, Clonable 就是其中之一.

如果是在不同包中的子类去访问的话,我们一般在这个子类中使用super去访问,这个时候,我们去Student中重写一下我们的clone 方法,那么此时代码报错变成了这个样子:

此时就是异常的问题了,现在我们将代码处理成这个样子:
public class Test {public static void main(String[] args) throws CloneNotSupportedException {Student student = new Student(10);Student student1 = student.clone();}
}
现在,代码报错是这个样子的:
也就是说:我们前面的返回值为Student,而后面的返回值为Object,便牵扯到了向下转型的问题,那么我们再将代码修改成这样:
public class Test {public static void main(String[] args) throws CloneNotSupportedException {Student student = new Student(10);Student student1 = (Student) student.clone();}
}
但是我们会发现在运行后依旧发生了报错:
那么此时,我们为了让代码指出克隆,需要实现Cloneable接口: 当实现这个接口后,我们会发现代码不再进行报错,可以正常运行了
那么这个接口的作用是什么呢?
这个接口叫做标记接口,实现了该接口证明当前类是可以被克隆的
完整的克隆代码如下:
class Student implements Cloneable{public int age;public Student(int age) {this.age = age;}@Overridepublic String toString() {return "Student{" +"age=" + age +'}';}@Overrideprotected Object clone() throws CloneNotSupportedException {return super.clone();}
}public class Test {public static void main(String[] args) throws CloneNotSupportedException {Student student = new Student(10);Student student1 = (Student) student.clone();}
}
现在,我们来看一下这段代码及其运行结果:
class Student implements Cloneable{public int age;public Money m = new Money();public Student(int age) {this.age = age;}@Overridepublic String toString() {return "Student{" +"age=" + age +'}';}@Overrideprotected Object clone() throws CloneNotSupportedException {return super.clone();}
}
class Money{public double money;}public class Test {public static void main(String[] args) throws CloneNotSupportedException {Student student1 = new Student(10);student1.m.money = 19.9;Student student2 = (Student) student1.clone();System.out.println(student1.m.money);System.out.println(student2.m.money);System.out.println("======================");student1.m.money = 29.9;System.out.println(student1.m.money);System.out.println(student2.m.money);}
}
运行结果: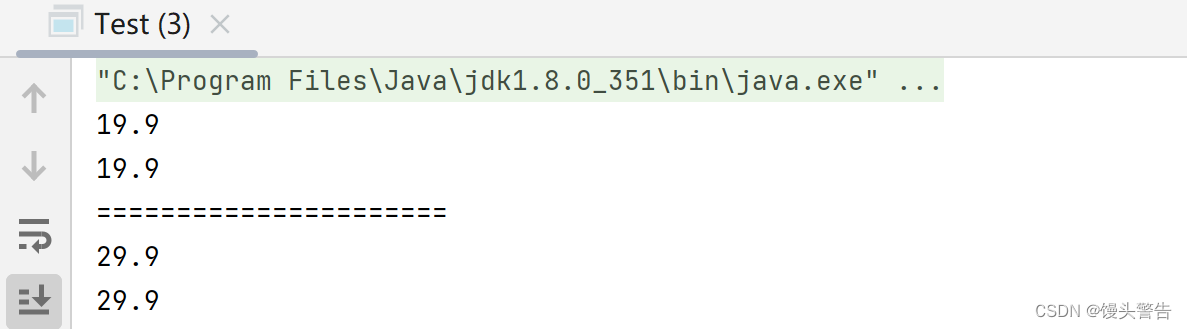
那么这个时候,便会产生疑问了:为什么在完成克隆后将student1的money该成了29.9,student2的money也会随之变化呢?
这是因为,克隆的是Student的里面的成员m,而m存储的是money的地址,因此当student1的money改变时,student2的money也会随之改变 ,我们可以用下面这张图来表示它们之间的关系:
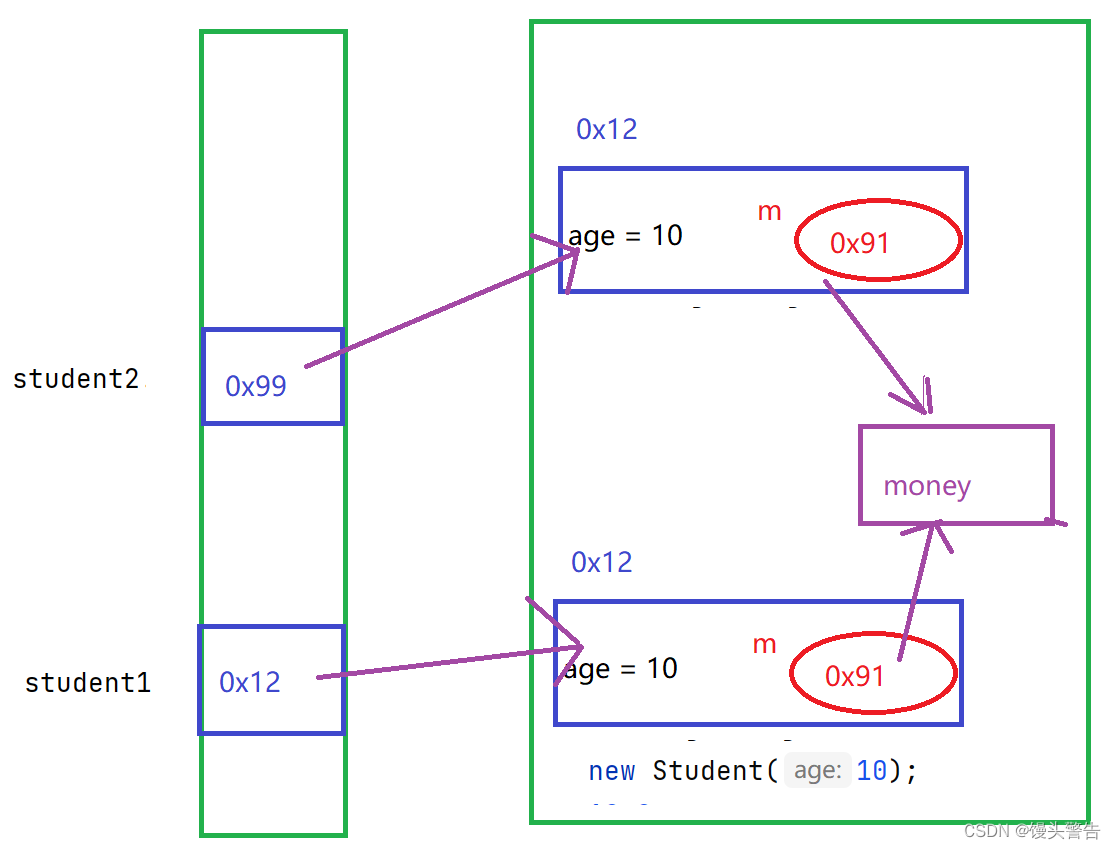
我们将这种拷贝称之为浅拷贝,如果我们能把Money对象也拷贝了,那么便是深拷贝。
那么现在,我们来看一下在这种情景下深拷贝的实现:
class Student implements Cloneable{public int age;public Money m = new Money();public Student(int age) {this.age = age;}@Overridepublic String toString() {return "Student{" +"age=" + age +'}';}@Overrideprotected Object clone() throws CloneNotSupportedException {Student tmp = (Student) super.clone();tmp.m = (Money) this.m.clone();return tmp;}
}
class Money implements Cloneable{public double money;@Overrideprotected Object clone() throws CloneNotSupportedException {return super.clone();}
}
public class Test {public static void main(String[] args) throws CloneNotSupportedException {Student student1 = new Student(10);student1.m.money = 19.9;Student student2 = (Student) student1.clone();System.out.println(student1.m.money);System.out.println(student2.m.money);System.out.println("======================");student1.m.money = 29.9;System.out.println(student1.m.money);System.out.println(student2.m.money);}
}
核心思想就是:每一个对象都要去拷贝!!!
三、Object类
1、什么是Object类
范例:使用Object接收所有类的对象
class Person{}
class Student{}
public class Test {public static void main(String[] args) {function(new Person());function(new Student());}public static void function(Object obj) {System.out.println(obj);}
}
//执行结果:
Person@1b6d3586
Student@4554617c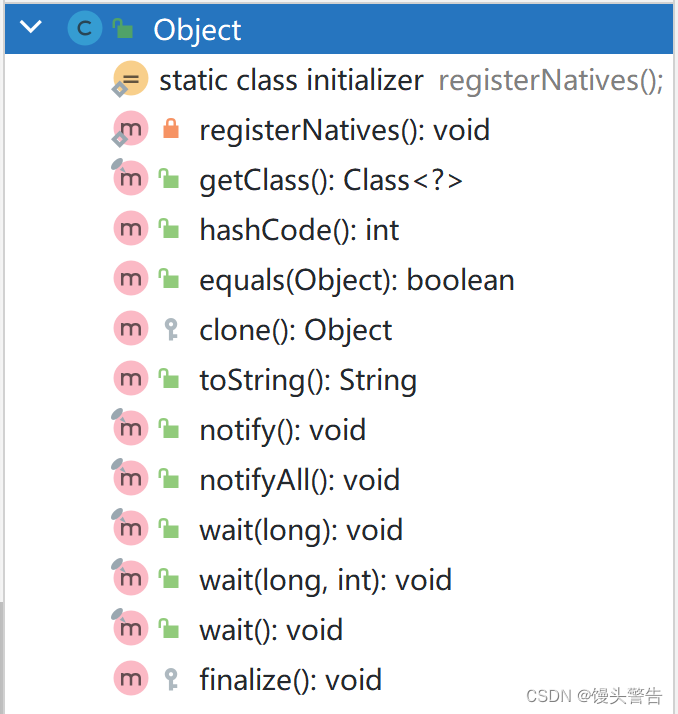
2、获取对象信息
3、对象比较equals方法
a.如果==左右两侧是基本类型变量,比较的是变量中值是否相同b.如果==左右两侧是引用类型变量,比较的是引用变量地址是否相同c.如果要比较对象中内容,必须重写Object中的equals方法,因为equals方法默认也是按照地址比较的:
那么现在,我们尝试Person类重写equals方法后,然后比较:
class Person{
...@Overridepublic boolean equals(Object obj) {if (obj == null) {return false ;}if(this == obj) {return true ;}
// 不是Person类对象if (!(obj instanceof Person)) {return false ;}Person person = (Person) obj ; // 向下转型,比较属性值return this.name.equals(person.name) && this.age==person.age ;}
}4、hashcode方法
public String toString() {return getClass().getName() + "@" + Integer.toHexString(hashCode());}public native int hashCode();class Person {public String name;public int age;public Person(String name, int age) {this.name = name;this.age = age;}
}
public class TestDemo4 {public static void main(String[] args) {Person per1 = new Person("lisi", 20) ;Person per2 = new Person("lisi", 20) ;System.out.println(per1.hashCode());System.out.println(per2.hashCode());}
}
//执行结果
460141958
1163157884class Person {public String name;public int age;public Person(String name, int age) {this.name = name;this.age = age;}@Overridepublic int hashCode() {return Objects.hash(name, age);}
}
public class TestDemo4 {public static void main(String[] args) {Person per1 = new Person("gaobo", 20) ;Person per2 = new Person("gaobo", 20) ;System.out.println(per1.hashCode());System.out.println(per2.hashCode());}
}
//执行结果
460141958
4601419581、hashcode方法用来确定对象在内存中存储的位置是否相同2、事实上hashCode() 在散列表中才有用,在其它情况下没用。在散列表中hashCode() 的作用是获取对象的散列码,进而确定该对象在散列表中的位置。
建议:一般自定义类型的时候要习惯重写equals和hashcode方法